Tag Archives: vmknic

Day-2 Operations – Performance Monitoring in the vSAN UI

Performance reporting or Performance Monitoring is something of a must in any storage environment today, I remember many times when I was in VMware Support when facing a customer storage performance issue that metrics were not there to capture the event, and most storage performance tools required enabling, obviously this meant that the issue had to be occurring at the time of the performance metrics grab, vSAN in the early days was no different, vSAN Observer whilst being a detailed tool and provided a lot of information, was not a historical tool, it was enabled to troubleshoot a performance issue that was happening at that particular time.

In the later releases of vSAN the UI came equipped with more performance metrics than you could shake a stick at, which from a performance troubleshooting and monitoring perspective is the dogs danglies, but what does this mean from an every day perspective?  Before we take a look at the UI, there are three areas where vSAN Performance metrics can be displayed

  • Cluster level – This is the performance metrics aggregated for the whole cluster and allow you to have the high level view of how your cluster is performing as a whole
  • Host Level – This allows you to look at how vSAN is performing on a host by host perspective and contains further information drilling down through things like Disk Groups, Physical Disks, Network Controllers, VMkernel interfaces.
  • VM Level – This focuses on a specific virtual machine and the objects associated with it.

So what information do we have exactly for a given observation level?  Well let’s first of all take a look at the cluster level performance information, there are three options under the performance tab for vSAN

  • vSAN – Virtual Machine Consumption
  • vSAN – Backend
  • vSAN – iSCSI

I have met many customers that immediately notice there is a big difference between the Virtual Machine Consumption and the Backend graphs, so before we go any further let’s talk about what each of these specific areas mean.

Virtual Machine Consumption
These graphs represent the values that objects residing on the vSAN Datastore are seeing, now remember everything that exists on vSAN is an object, so consumers that are counted in these graphs are Virtual Machines, Stats Objects etc
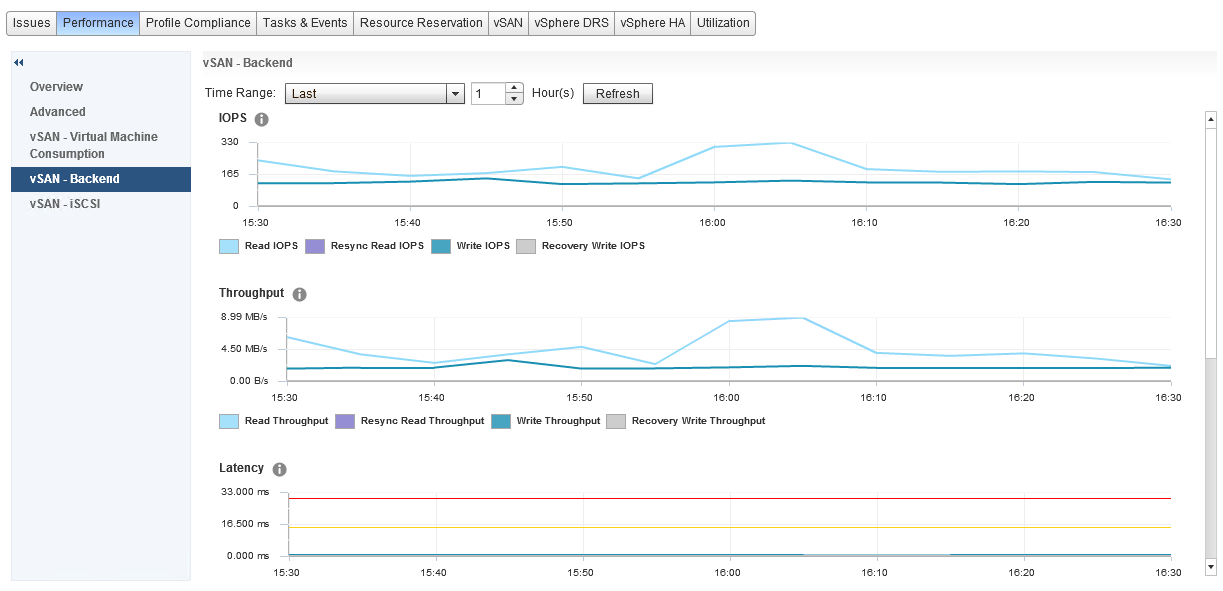
Backend
These graphs represent the backend disks associated with vSAN, cache and capacity

Both sets of graphs cover the statistics for:

  • IOPS
  • Throughput
  • Latency
  • Congestion
  • Outstanding I/O

iSCSI
The iSCSI Performance graphs contain all the graphs above with the exception of Congestion, these graphs are in relation to each iSCSI Target/LUN created and each one is selected in turn to review the performance graphs associated.

If we move our focus to a host level, in here we have a number of options in addition to the three we also see at a cluster level, however there is some additional metrics we get at a host level for Virtual Machine Consumption and Backend, in the Virtual Machine Consumption graph we have Local Client Cache Hit IOPS and Local Client Cache Hit Rate

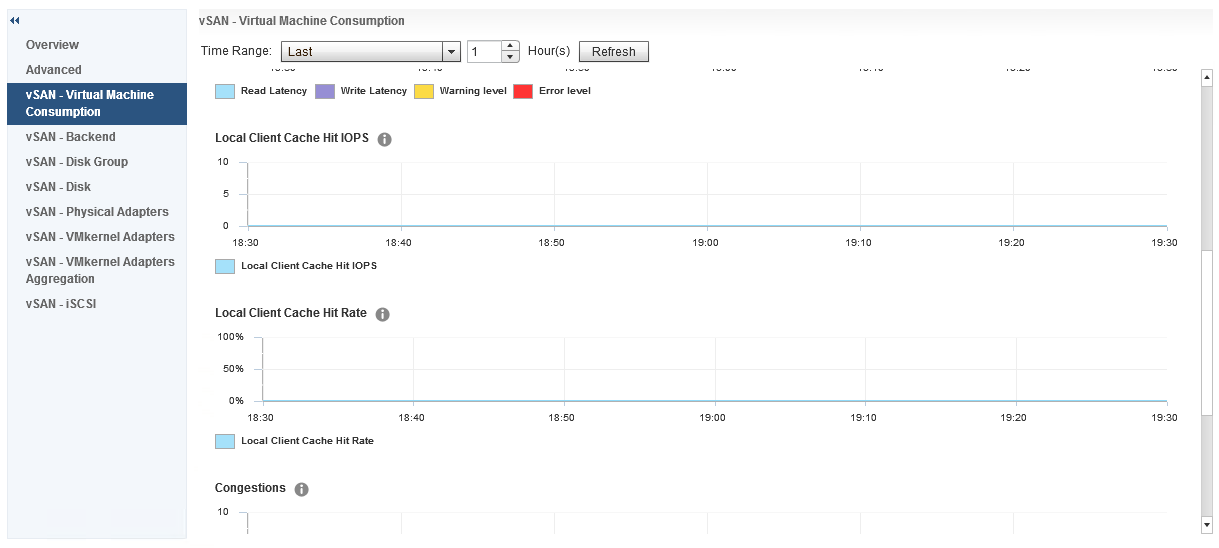
And under Backend we also have some additional graphs for Resync IOPS, Resync Throughput and Resync Latency
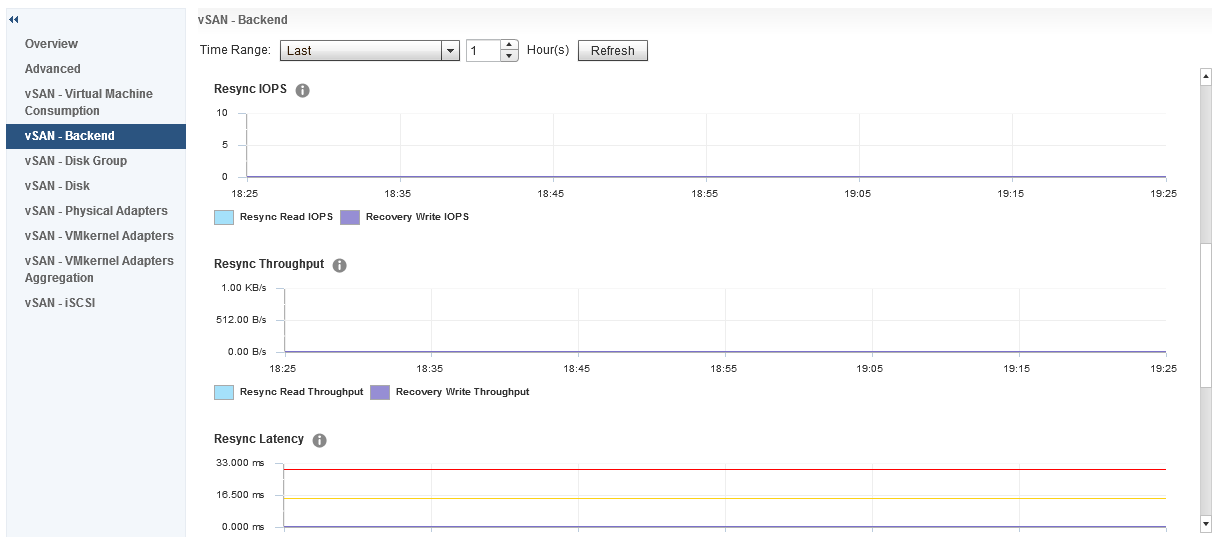
The resync metrics are extremely important if vSAN is recovering from a failure of some sort and performing a resync of degraded components, it is also important if you are performing a pro-active rebalance, policy change or a full data migration during host or disk/diskgroup evacuation.

The other options listed under host vSAN performance are:

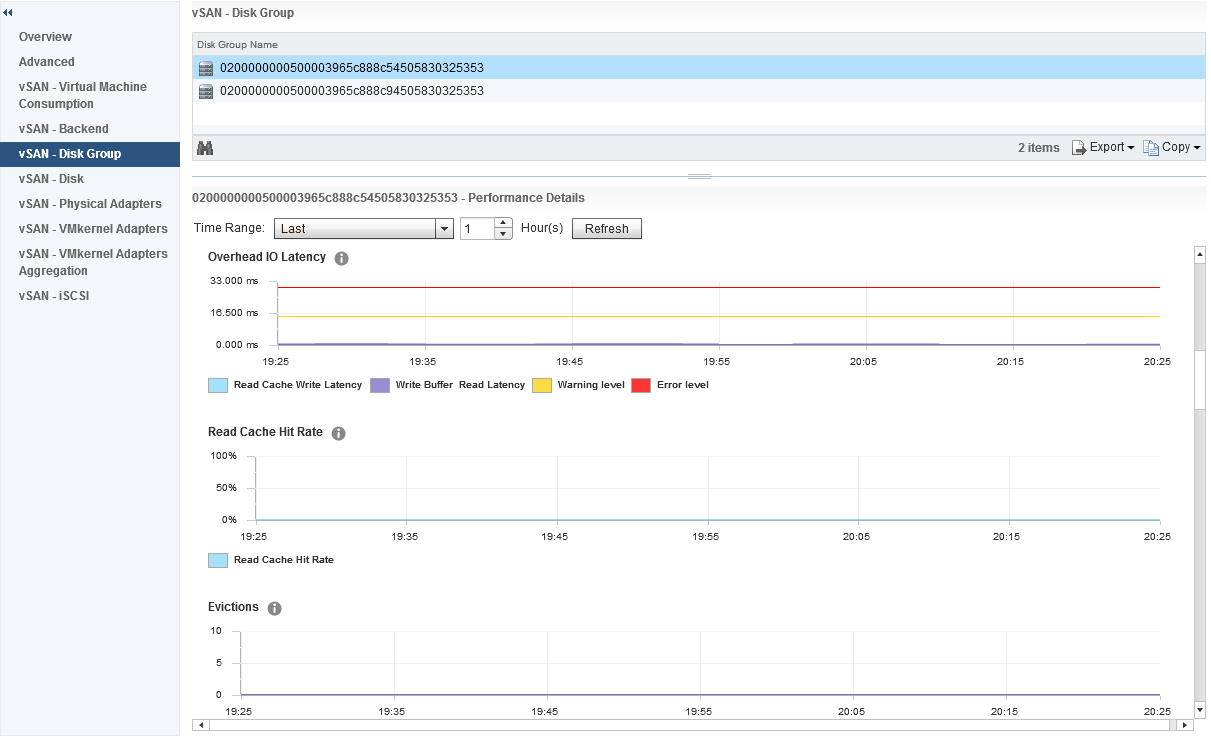
  • Disk Group – Shows the performance graphs for the disk groups, I will cover this below as this is one of the most interesting set of metrics with a lot of detail.
  • Disk – Shows the physical disks in the host reporting on IOPS, Throughput and  Latency
  • Physical Adapters – Shows the network stats for each vmnic associated with vSAN, stats include Packet Loss Rate which is good for troubleshooting networking issues
  • VMkernel Adapters – Shows the statistics for each VMkernel configured for vSAN, this also includes a Packet Loss Rate which you can then use to troubleshoot the software network stack
  • VMkernel Adapters Aggregation – This is an aggregation of all VMkernel interfaces being used for vSAN on the host

Now let’s go back to the Disk Group performance graphs, as I said earlier this is a very interesting group of metrics to explore, so what do we have in this group?  The first section is all about Frontend (Guest) IOPS, Throughput and Latency

The frontend statistics are maybe as you have guessed already, they are related to vSAN Object I/O being generated from guests running within the vSAN cluster.  If we scroll down a little further we can see statistics relating to Overhead IO,  Read Cache Hit Rate (for hybrid) and Evictions:

Further down we have statistics relating to the vSAN Write Buffer and De-stage rate clearly showing how much of the write buffer is free and also how quickly data is being de-staged from cache to capacity, now we also have resync metrics under disk groups, however this differs slightly against the Cluster Wide Backend statistics, in the disk group graphs we actually have values that represent various aspects of the Resync Operations, the graph differentiates between:

  • Policy Changes
  • Repairs
  • Rebalance

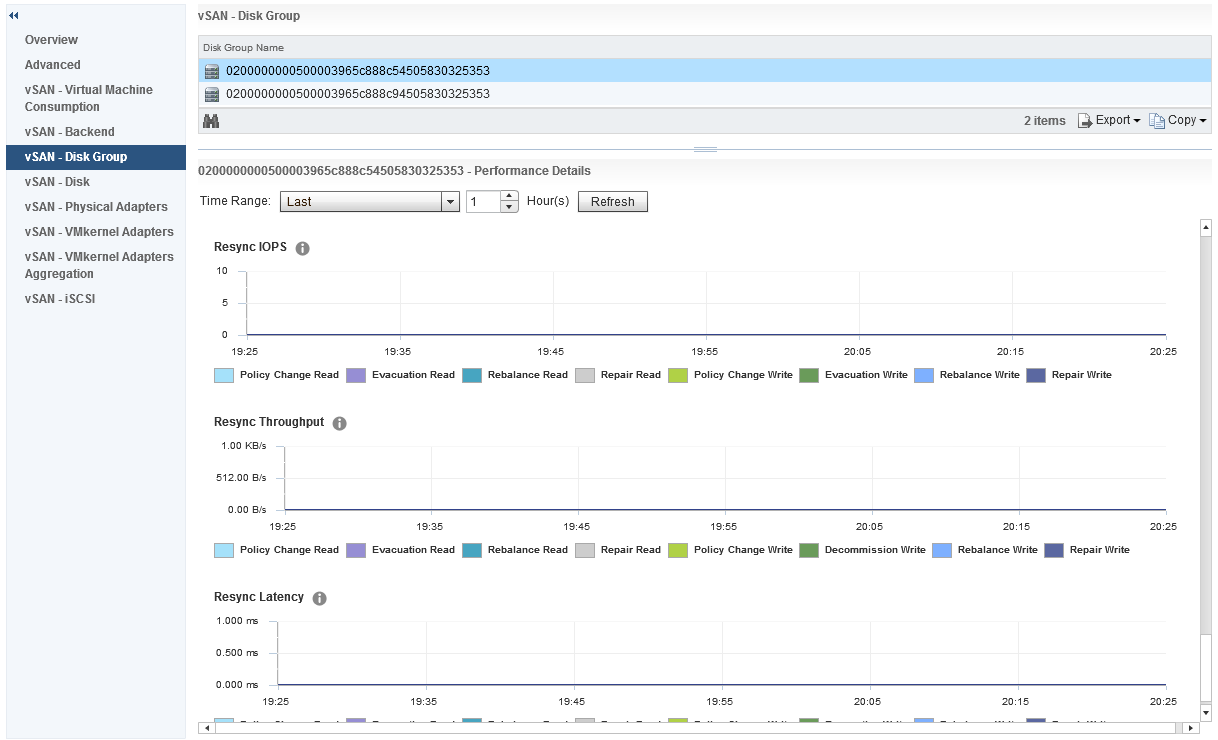
So you can easily distinguish what resync operations are happening by the statistics within the disk group stats.

Collection Interval
The vSAN Performance metrics collect the sample every five minutes, and this is an average over that five minute period, if your cluster is hardly doing anything (like my cluster for the screenshots) then this can throw out some of the latency numbers, in my own cluster I have noticed it shows higher latency when doing practically nothing than it does when I start putting load on the cluster.  I have spoken to many customers about this, it is no concern, it just means that during the collection sample maybe a few “Large” IO operations returned a larger Latency and because of the low number of samples, this skews the average, so no cause for alarm on that one.

Up next will be Day-2 Operations, Performance Monitoring with vROPS, I just have to write it first 🙂

Creating a vSAN Cluster without a vCenter Server

I have been asked many times about creating a 3-node vSAN cluster without a vCenter server, the main reason for doing this is that you need to place your vCenter server onto the vSAN datastore but have no where to host the vCenter server until doing so.? The many customers I have spoken to are not aware that they can do this from the command line very easily.? In order to do this you must have installed ESXi 6.0 U2 and enabled SSH access to the host, there are a few steps in order to do this

  1. Configure the vSAN VMKernel Interface
  2. Create the vSAN Cluster
  3. Add the other nodes to the cluster
  4. Claim the disks

Step 1 – Create the VMKernel interface
In order for vSAN to function you need to create a VMKernel Interface on each host, this requires other dependencies such as a vSwitch and a Port Group, so performing this on all three hosts is a must so lets do it in this order, firstly lets create our vSwitch, since vSwitch0 exists for the management network we’ll create a vSwitch1

esxcli network vswitch standard add -v vSwitch1

Once our vSwitch1 is created we then need to add the physical uplinks to our switch, to help identify which uplinks to use we run the following command

esxcli network nic list

This should return details on all the physical network cards on the host for example:

Name PCI Driver Link Speed Duplex MAC Address MTU Description
vmnic0 0000:01:00.0 ntg3 Up 1000Mbps Full 44:a8:42:29:fe:98 1500 Broadcom Corporation NetXtreme BCM5720 Gigabit Ethernet
vmnic1 0000:01:00.1 ntg3 Up 1000Mbps Full 44:a8:42:29:fe:99 1500 Broadcom Corporation NetXtreme BCM5720 Gigabit Ethernet
vmnic2 0000:02:00.0 ntg3 Down 0Mbps Half 44:a8:42:29:fe:9a 1500 Broadcom Corporation NetXtreme BCM5720 Gigabit Ethernet
vmnic3 0000:02:00.1 ntg3 Down 0Mbps Half 44:a8:42:29:fe:9b 1500 Broadcom Corporation NetXtreme BCM5720 Gigabit Ethernet
vmnic4 0000:82:00.0 ixgbe Up 10000Mbps Full a0:36:9f:78:94:cc 1500 Intel Corporation Ethernet Controller 10 Gigabit X540-AT2
vmnic5 0000:82:00.1 ixgbe Up 10000Mbps Full a0:36:9f:78:94:ce 1500?? Intel Corporation Ethernet Controller 10 Gigabit X540-AT2
vmnic6 0000:04:00.0 ixgbe Up 10000Mbps Full a0:36:9f:78:94:c4 1500 Intel Corporation Ethernet Controller 10 Gigabit X540-AT2
vmnic7 0000:04:00.1 ixgbe Up 10000Mbps Full a0:36:9f:78:94:c6 1500 Intel Corporation Ethernet Controller 10 Gigabit X540-AT2

For my cluster I am going to add vmnic5 to the vSwitch1 so for this I run the following command:

esxcli network vswitch standard uplink add -v vSwitch1 -u vmnic5

Now that we now have our uplink connected to vSwitch1 we need to configure a portGroup for vSAN, for this I am calling my portGroup name “vSAN”

esxcfg-vswitch -A vSAN vSwitch1

Now we need to create out VMKernel interface with an IP Address (192.168.100.1 for Host 1), Subnet Mask and assign it to the “vSAN” portGroup

esxcfg-vmknic -a -i 192.168.100.1 -n 255.255.255.0 -p vSAN

We validate our VMKernel Interface by running the following command:

[root@se-emea-vsan01:~] esxcfg-vmknic -l
Interface Port Group/DVPort/Opaque Network IP Family IP Address Netmask Broadcast MAC Address MTU TSO MSS Enabled Type NetStack
vmk0 Management Network IPv4 172.16.101.1 255.255.252.0 172.16.103.255 44:a8:42:29:fe:98 1500 65535 true STATIC defaultTcpipStack
vmk1 vSAN IPv4 192.168.100.1 255.255.255.0 192.168.100.255 00:50:56:6a:5d:06 1500 65535 true STATIC defaultTcpipStack

In order to add the VMKernel interface to vSAN we need to run the following command:

esxcli vsan network ip add -i vmk1

Repeat the above steps on the two remaining hosts that you wish to participate in the cluster

Step 2 – Creating the cluster
Once we have all the VMKernel interfaces configured on all hosts, we now need to create a vSAN Cluster on the first host, to do this we run the following command

esxcli vsan cluster new

Once completed we can get our vSAN Cluster UUID by running the following command:

[root@se-emea-vsan01:~] esxcli vsan cluster get
Cluster Information
 Enabled: true
 Current Local Time: 2016-11-21T15:17:57Z
 Local Node UUID: 582a29ea-cbfc-195e-f794-a0369f7894c4
 Local Node Type: NORMAL
 Local Node State: MASTER
 Local Node Health State: HEALTHY
 Sub-Cluster Master UUID: 582a2bba-0fd8-b45a-7460-a0369f749a0c
 Sub-Cluster Backup UUID: 582a29ea-cbfc-195e-f794-a0369f7894c4
 Sub-Cluster UUID: 52bca225-0520-fd68-46c4-5e7edca5dfbd
 Sub-Cluster Membership Entry Revision: 6
 Sub-Cluster Member Count: 1
 Sub-Cluster Member UUIDs: 582a29ea-cbfc-195e-f794-a0369f7894c4
 Sub-Cluster Membership UUID: d2dd2c58-da70-bbb9-9e1a-a0369f749a0c

Step 3 – Adding the other nodes to the cluster
From the remaining hosts run the following command adding them to the newly created cluster

esxcli vsan cluster join -u 52bca225-0520-fd68-46c4-5e7edca5dfbd

You can verify that the nodes have successfully joined the cluster by running the same command we ran earlier noting that the Sub-Cluster Member Count has increased to 3 and it also shows the other sub cluster UUID Members:

[root@se-emea-vsan01:~] esxcli vsan cluster get
Cluster Information
 Enabled: true
 Current Local Time: 2016-11-21T15:17:57Z
 Local Node UUID: 582a29ea-cbfc-195e-f794-a0369f7894c4
 Local Node Type: NORMAL
 Local Node State: MASTER
 Local Node Health State: HEALTHY
 Sub-Cluster Master UUID: 582a2bba-0fd8-b45a-7460-a0369f749a0c
 Sub-Cluster Backup UUID: 582a29ea-cbfc-195e-f794-a0369f7894c4
 Sub-Cluster UUID: 52bca225-0520-fd68-46c4-5e7edca5dfbd
 Sub-Cluster Membership Entry Revision: 6
 Sub-Cluster Member Count: 3
 Sub-Cluster Member UUIDs: 582a29ea-cbfc-195e-f794-a0369f7894c4, 582a2bf8-4e36-abbf-5318-a0369f7894d4, 582a2c3b-d104-b96d-d089-a0369f78946c
 Sub-Cluster Membership UUID: d2dd2c58-da70-bbb9-9e1a-a0369f749a0c

Step 4 – Claim Disks
Our cluster is now created and we need to claim the disks in each node to be used by vSAN, in order to do this we first of all need to identify which disks are to be used by vSAN as a Cache Disk and as Capacity Disks, and obviously the number of disk groups, to show the disk information for the disks in the host run the following command:

esxcli storage core device list

This will produce an output similar to the following where we can identify the NAA ID for each device:

naa.500003965c8a48a4
 Display Name: TOSHIBA Serial Attached SCSI Disk (naa.500003965c8a48a4)
 Has Settable Display Name: true
 Size: 381554
 Device Type: Direct-Access
 Multipath Plugin: NMP
 Devfs Path: /vmfs/devices/disks/naa.500003965c8a48a4
 Vendor: TOSHIBA
 Model: PX02SMF040
 Revision: A3AF
 SCSI Level: 6
 Is Pseudo: false
 Status: on
 Is RDM Capable: true
 Is Local: true
 Is Removable: false
 Is SSD: true
 Is VVOL PE: false
 Is Offline: false
 Is Perennially Reserved: false
 Queue Full Sample Size: 0
 Queue Full Threshold: 0
 Thin Provisioning Status: yes
 Attached Filters:
 VAAI Status: unknown
 Other UIDs: vml.0200000000500003965c8a48a450583032534d
 Is Shared Clusterwide: false
 Is Local SAS Device: true
 Is SAS: true
 Is USB: false
 Is Boot USB Device: false
 Is Boot Device: false
 Device Max Queue Depth: 64
 No of outstanding IOs with competing worlds: 32
 Drive Type: physical
 RAID Level: NA
 Number of Physical Drives: 1
 Protection Enabled: false
 PI Activated: false
 PI Type: 0
 PI Protection Mask: NO PROTECTION
 Supported Guard Types: NO GUARD SUPPORT
 DIX Enabled: false
 DIX Guard Type: NO GUARD SUPPORT
 Emulated DIX/DIF Enabled: false

In my setup I want to create two disk groups per host consisting of 4 capacity devices plus my cache so to create one disk group I run the following command:

esxcli vsan storage add -s <naa for cache disk> -d <naa for capacity disk 1> -d <naa for capacity disk 2> -d <naa for capacity disk 3> -d <naa for capacity disk 4>

Once you have performed the above on each of your hosts, your vSAN cluster is deployed with storage and you can now deploy your vCenter appliance onto the vSAN datastore where then you can manage your vSAN License, Storage Policies, switch on vSAN Services such as iSCSI, health service and performance services as well as start to deploy virtual machines