As part of the Health UI Plugin in Virtual SAN 6.0 comes a a feature that allows users to simulate a Magnetic Disk or SSD disk failure by injecting an error to the device, this is a feature that I have used a number of times with customers as part of their Proof of Concept and works extremely well to fully validate the behaviour of Virtual SAN under disk or SSD failure conditions, the command line tool can inject two types of errors:
- Permanent device error
- Transient device error which you can specify a timeout value
Before I go into further detail I would just like to say that this should only be used in a pre-production environment for example a Proof of Concept
Tool location
The actual tool is a python script called vsanDiskFaultInjection.pyc and is located in the following folder on ESXi after deploying the health UI plugin
/usr/lib/vmware/vsan/bin
You can run the following command which will give you all the command line options available with the tool:
[root@vsan01/usr/lib/vmware/vsan/bin] python vsanDiskFaultInjection.pyc -h
Usage:
      vsanDiskFaultInjection.pyc -t -r error_durationSecs -d deviceName
      vsanDiskFaultInjection.pyc -p -d deviceName
      vsanDiskFaultInjection.pyc -c -d deviceName

Options:
-h, --help           Show this help message and exit
-u                   Inject hot unplug
-t                   Inject transient error
-p                   Inject permanent error
-c                   Clear injected error
-r ERRORDURATION     Transient error duration in seconds
-d DEVICENAME,--devicename=DEVICENAME
The workflow I typically use for this would be as follows:
- Identify the disk device you wish to inject the error
- Inject a permanent device error to the chosen device
- Check the resync tab in the Virtual SAN UI
- Once the resync operations have completed clear the injected error
- Remove the disk from the disk group (untick the option to migrate data)
- Add the disk back to the disk group
Please note: If you perform these steps on the SSD which heads a disk group this will result in the failure of a whole disk group, it will be necessary to remove the disk group and create a new one after the error injection is cleared
naa.5000c50062ae5b8f:
?? Device: naa.5000c500644fe348
?? Display Name: naa.5000c500644fe348
?? Is SSD: false
?? VSAN UUID: 52207038-8011-a1f2-4dda-b7726c1446ac
?? VSAN Disk Group UUID: 523afae5-baf1-e0a4-9487-8422087d486b
?? VSAN Disk Group Name: naa.5000cca02b2f9ab8
?? Used by this host: true
?? In CMMDS: true
?? Checksum: 3819875389982737025
?? Checksum OK: true
?? Emulated DIX/DIF Enabled: false

naa.5000c50062abc3ff:
?? Device: naa.5000c50062abc3ff
?? Display Name: naa.5000c50062abc3ff
?? Is SSD: false
?? VSAN UUID: 522fdad4-014f-fae9-a22b-c56b9506babe
?? VSAN Disk Group UUID: 52e6f997-8d6c-732a-9879-e37b454dbc39
?? VSAN Disk Group Name: naa.5000cca02b2f7c18
?? Used by this host: true
?? In CMMDS: true
?? Checksum: 15273555660141709779
?? Checksum OK: true
?? Emulated DIX/DIF Enabled: false

naa.5000c50062ae1cc7:
?? Device: naa.5000c50062ae1cc7
?? Display Name: naa.5000c50062ae1cc7
?? Is SSD: false
?? VSAN UUID: 5235241c-0e95-97e2-2c82-8cef75ce7944
?? VSAN Disk Group UUID: 52e6f997-8d6c-732a-9879-e37b454dbc39
?? VSAN Disk Group Name: naa.5000cca02b2f7c18
?? Used by this host: true
?? In CMMDS: true
?? Checksum: 4356104544658285915
?? Checksum OK: true
?? Emulated DIX/DIF Enabled: false

naa.5000cca02b2f9ab8:
?? Device: naa.5000cca02b2f9ab8
?? Display Name: naa.5000cca02b2f9ab8
?? Is SSD: true
?? VSAN UUID: 523afae5-baf1-e0a4-9487-8422087d486b
?? VSAN Disk Group UUID: 523afae5-baf1-e0a4-9487-8422087d486b
?? VSAN Disk Group Name: naa.5000cca02b2f9ab8
?? Used by this host: true
?? In CMMDS: true
?? Checksum: 7923014052263251576
?? Checksum OK: true
?? Emulated DIX/DIF Enabled: false

naa.50000395e82b640c:
?? Device: naa.50000395e82b640c
?? Display Name: naa.50000395e82b640c
?? Is SSD: false
?? VSAN UUID: 525da647-7086-0daf-f68d-bd97a10926b3
?? VSAN Disk Group UUID: 523afae5-baf1-e0a4-9487-8422087d486b
?? VSAN Disk Group Name: naa.5000cca02b2f9ab8
?? Used by this host: true
?? In CMMDS: true
?? Checksum: 16797787677570053813
?? Checksum OK: true
?? Emulated DIX/DIF Enabled: false

naa.5000cca02b2f7c18:
?? Device: naa.5000cca02b2f7c18
?? Display Name: naa.5000cca02b2f7c18
?? Is SSD: true
?? VSAN UUID: 52e6f997-8d6c-732a-9879-e37b454dbc39
?? VSAN Disk Group UUID: 52e6f997-8d6c-732a-9879-e37b454dbc39
?? VSAN Disk Group Name: naa.5000cca02b2f7c18
?? Used by this host: true
?? In CMMDS: true
?? Checksum: 16956194795890120879
?? Checksum OK: true
?? Emulated DIX/DIF Enabled: false
Step 2. Inject a permanent device error to the chosen device
For this I am going to choose naa.5000c500644fe348 which is a Magnetic Disk from disk group naa.5000cca02b2f9ab8
[root@vsan01/usr/lib/vmware/vsan/bin] python vsanDiskFaultInjection.pyc -p -d naa.5000c500644fe348
Injecting permanent error on device vmhba0:C0:T1:L0
vsish -e set /reliability/vmkstress/ScsiPathInjectError 0x1
vsish -e set /storage/scsifw/paths/vmhba0:C0:T1:L0/injectError 0x0311030000000
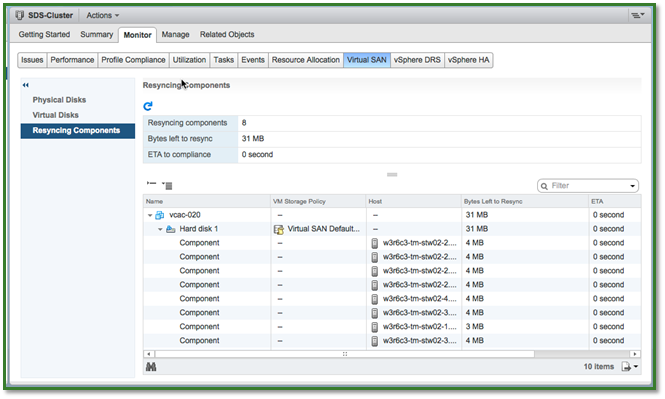
Step 3. Check the resync tab in the Virtual SAN UI
Step 4. Once the resync operations have completed clear the injected error
[root@vsan01/usr/lib/vmware/vsan/bin] python vsanDiskFaultInjection.pyc -c -d naa.5000c500644fe348
Clearing errors on device vmhba0:C0:T1:L0
vsish -e set /storage/scsifw/paths/vmhba0:C0:T1:L0/injectError 0x00000
vsish -e set /reliability/vmkstress/ScsiPathInjectError 0x00000
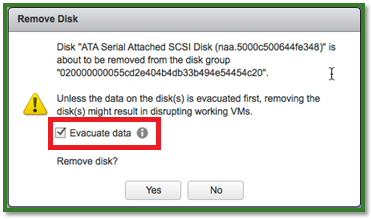
Step 5. Remove the disk from the disk group (untick the option to migrate data)
It is important in this step to untick the option to evacuate data, because the disk has been failed and data has been rebuilt elsewhere in the cluster there is no data to evacuate, leaving this option ticked will result in a failure message informing you that the task failed, note: if you are performing the test on an SSD that is the cache for a disk group then the removal of the disk group is required
Note: The disk group in the UI corresponds only to the UI and this is why it differs from the disk group name on the ESXi command line
Step 6. Add the disk back to the disk group
There we have it, disk failure testing in Virtual SAN made simple with the Error Injection Tool which is part of the Virtual SAN Health UI Plugin, I use this all of the time when assisting customers with Proof of Concepts on Virtual SAN, it makes my life and the customers life so much easier and allows the workflow to be much faster too, remember……Pre-Production only folks, I am not responsible for you doing this in a production environment 🙂