Configuring the Dell PERC H730 Controller for Passthrough and RAID

Sometimes during a deployment you might not be able to or want to install ESXi to the embedded SD Card controller on the Dell PowerEdge servers, for example if your memory configuration exceeds 512GB of RAM then installing ESXi to an SD Card would not be supported, or you may want to have a locally defined Scratch Partition on a local VMFS volume rather than using a remote Syslog or NFS Share, so what are the options?

Well you could boot ESXi from a single disk, the downside to that is if the disk fails then you are in a host down situation, the other option is to use two disks in a RAID1 mirror and use that for the ESXi installation.? With servers such as the R730XD you can utilise all 24 drive slots in the front of the server for Virtual SAN, and then two rear 2.5 Inch slots for your RAID 1 Mirror drives.? In my lab environment I have a similar config, I have a bunch of SSD drives used by Virtual SAN and then two 300GB 10K SAS Drives in a RAID 1 Mirror for my ESXi install and local VMFS Volume.? So how do we configure the H730 controller to support both Passthrough Disks and RAID disks?

Please note: For production environments this type of configuration is not supported

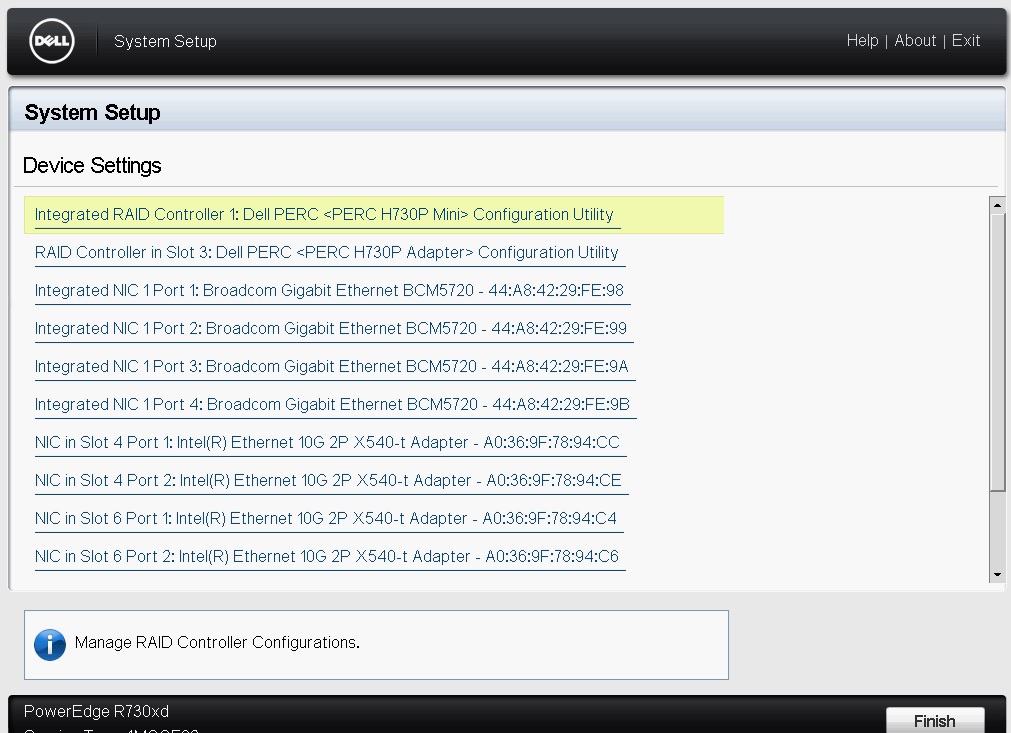
The first thing we need to do is ensure that the controller itself is configured for RAID Mode, for those that do not know, the H730 controller can be configured in either RAID Mode or HBA Mode.? RAID Mode allows you to create RAID Virtual Disks to be handled by the Logical Disk Controller as part of a RAID Volume, it also allows you to configure physical disks as NON-RAID disks, HBA Mode allows you to configure disks as NON-RAID capable only, in order to set the controller as RAID Mode we need to enter the System Setup Screen, to do this reboot the host and press F2 to enter the System Setup Main Menu, once there we need to enter the Device Settings option

SystemSetup


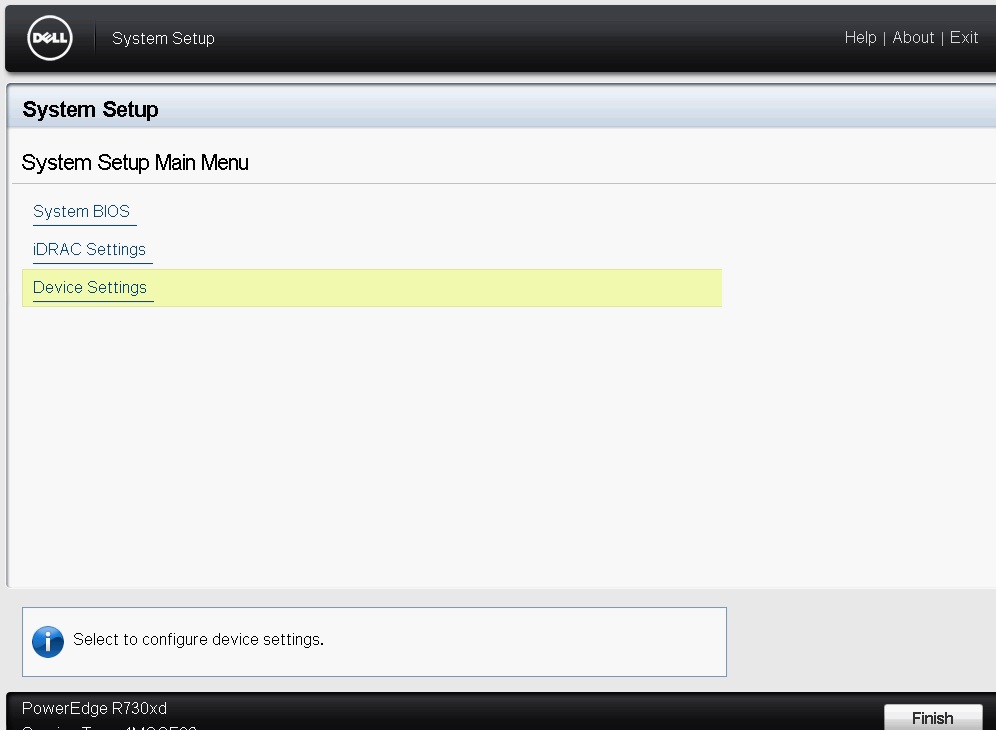
This section of the System Setup will allow you to change the settings for any devices connected in the system, for the purpose of this article we will be focusing on the PERC H730 controller, in my servers I have two controllers, so I am selecting the one that is second in the list labelled RAID Controller in Slot 3: Dell PERC <PERC H730P Adapter> Configuration Utility

DeviceSettings


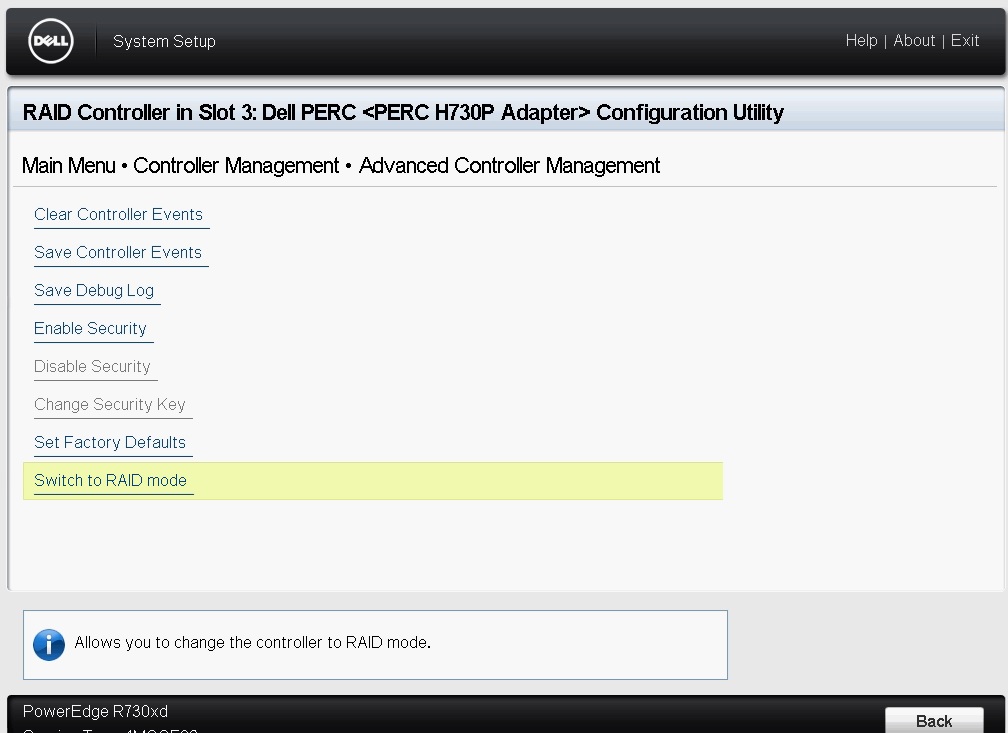
Once in the Device settings we need to chose the option for Controller Management and at the way to the bottom and choose the option for Advanced Controller Management, in there you will see an option for Switch to RAID Mode, when selected it will inform you that a reboot is required, do not reboot the host just yet.

SwitchtoRAIDMode


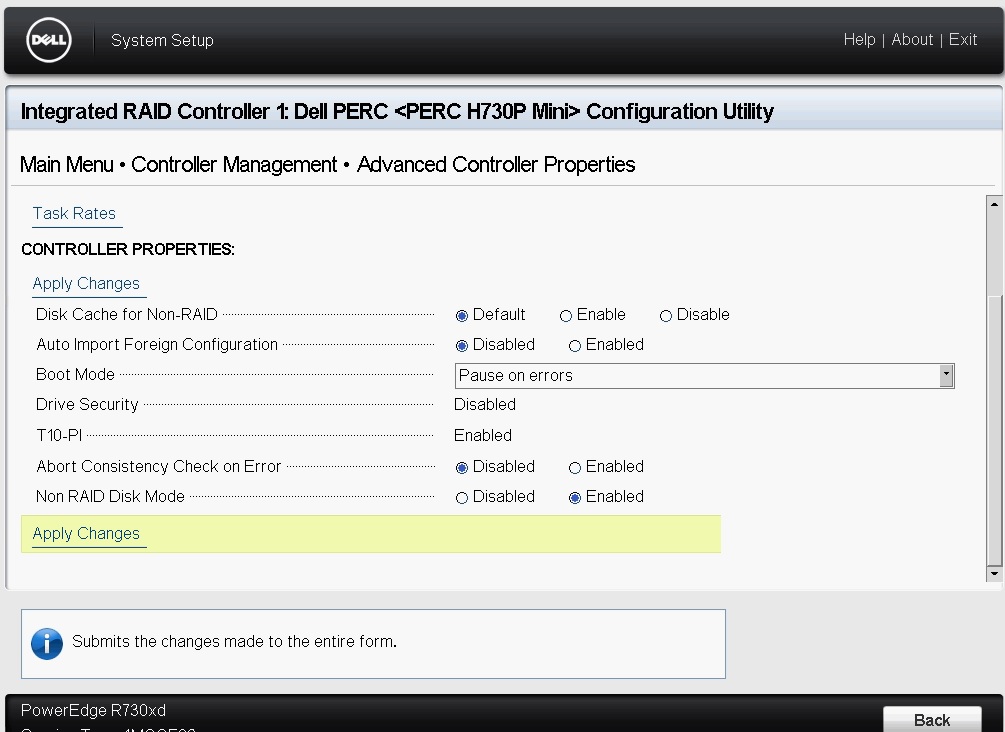
Now we need to ensure that NON-RAID Disk Mode is enabled, for this, click on Back and enter the Advanced Controller Properties at the bottom of the screen and select the option to enable for Non RAID Disk Mode and hit Apply Changed

RAIDMode


At this point you will need to make the disks you wish to use as a RAID1 as RAID Capable, you can do this under Configuration Management and choose the option to Convert to RAID Capable, from within here select the two disks you wish to use as your RAID 1 and click on OK, check the Confirm box and click on yes to confirm

ConvertRAIDCapable


Click on Back to go to the main menu and then re-select Configuration Management and chose the option to Create Virtual Disk and proceed to create your RAID 1 disk, it will only let you select disks that have been switched to RAID capable, after completion, check that all other disks are seen as NON-RAID Disks under Physical Disk Management, since we switched the controller from HBA Mode to RAID Mode all the other disks should still be tagged as NON-RAID

Now your PERC H730 controller is configured for both RAID and Passthrough and your RAID1 Virtual Disk can be used to install your ESXi, during the ESXi installation, make sure you install to the correct disk, and all your other disks are passthrough mode and can be consumed by Virtual SAN


Powering down a Virtual SAN Cluster

I speak with my customers and colleagues about this very topic, so I thought it was about time I wrote a post on how to power down a Virtual SAN cluster the correct way after all there may be countless reasons why you need to do this, from Scheduled Power Outages to Essential Building Maintenance.? There are a number of factors that have to be taken into account one major factor is when your Virtual Center server is actually running on the Virtual SAN cluster you wish to power down, in order to write this blog post I performed the actions on an 8-Node All-Flash cluster where the Virtual Center Appliance is also running within the Virtual SAN environment.

In order to perform the shutdown of the cluster you will need access to

  1. The vCenter Web Client
  2. Access to the vCenter
  3. SSH Access to the hosts, or access to the VMware Host Client

Step 1 – Powering off the Virtual Machines

Powering off the virtual machines can be done in multiple ways, the easiest way is through the WebUI, especially if you have a large number of virtual machines.? There are other ways that virtual machines can be powered off such as:

  • PowerCLI
  • PowerShell
  • vim-cmd directly on the ESXi hosts

VCVAShutdownscreenStep 2 – Powering down the Virtual Center Server

If your vCenter Server is running on your Virtual SAN datastore like my cluster then you will have to power down the vCenter Server after powering down the other virtual machines, if you are using the Windows vCenter Server you can simply RDP to the server and shut down the Windows Server itself, if you are like me and using the vCenter Appliance you can simply point a web browser to the vCenter IP or Fully Qualified Domain Name and Port 5480 and log in as the root user, from within there you will have the option to Shutdown the vCenter Appliance


Step 3 – Place the hosts into maintenance mode

Because our vCenter server is powered down, we won’t obviously be able to do this through the vCenter Web Client, so what are our easiest alternatives, well we can SSH into each host one at a time and run the command

# esxcli system maintenanceMode set -e -m noAction

The above command will place the host into maintenance mode and specifying “Do Nothing” as the response to the migration or ensuring that data will be accessible in the VSAN cluster, the reason behind this is that your virtual machines are powered off now anyway.

VSANHostClient
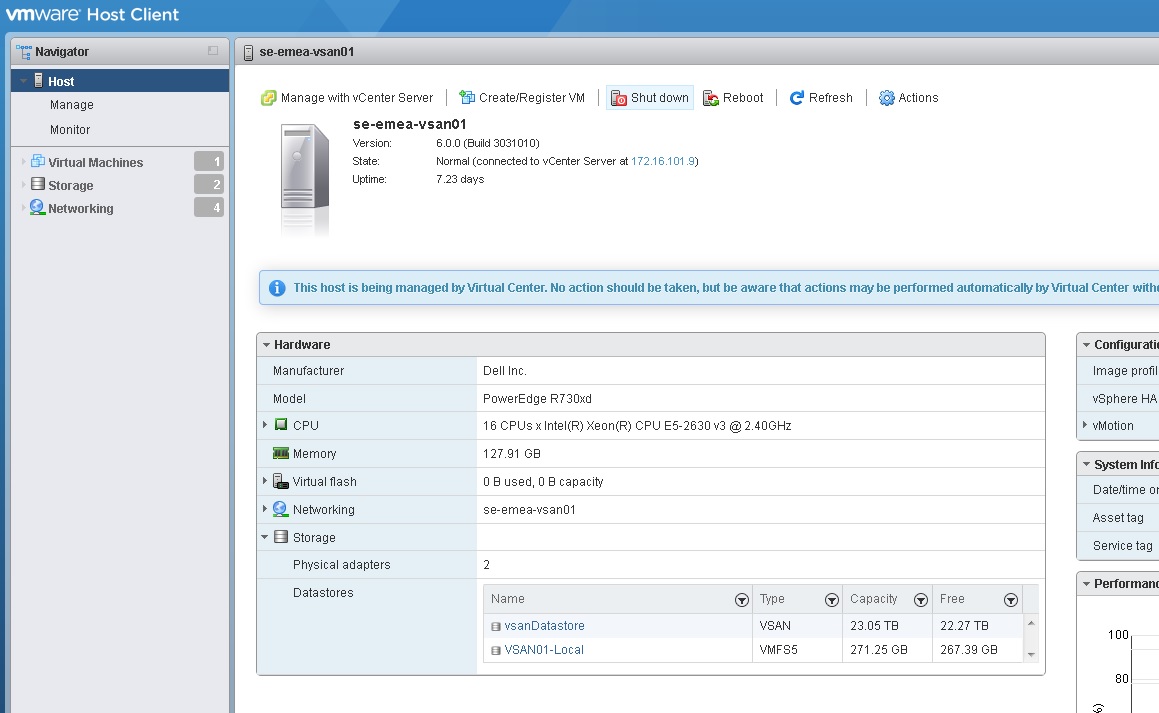
One of the other options and I would highly recommend this option is the VMware Host Client, this is basically a vib you install on each of your hosts, and then you point your web browser to the IP address or FQDN with a “/ui” at the end, this will bring you to a host based web client that is fantastic to use for managing an ESXi host outside of vCenter, from within this client you can place the host into maintenance mode from the Actions tab, and also shut the host down from the same tab.

One of the things I noticed when placing a host into maintenance mode here is that it did not present me with any options with regards to what to do with the data, the default behaviour here is “Ensure Accessibility”, due to the nature of this setting, this will prevent you putting all of your hosts into maintenance mode, so with the last hosts remaining, there are two choices

  • Log into the hosts via SSH and perform the command mentioned earlier
  • Shut the hosts down without entering maintenance mode

Since there are no running virtual machines, and the way Virtual SAN stores the disk objects there is no risk to data by doing either option, after all some power outages are unscheduled and Virtual SAN recovers from those seamlessly.


Step 4 – Power Down the ESXi hosts

Once all the hosts have been placed into maintenance mode we now need to power down any hosts that are still powered on from the previous step, this can be done without vCenter a number of ways:

  • Direct console access or via a remote management controller such as ILO/iDRAC/BMC
  • SSH access by running the command “dcui” and following the function keys to shutdown the system
  • From the ESXi command line by running the following command
    # esxcli system shutdown poweroff -r Scheduled
  • From the VMware Host Client as directed in the previous step


That’s it, your cluster is now correctly shut down, after your scheduled outage is over, the task of bringing up your cluster is straight forward

  1. Power up the hosts
  2. Use SSH or the VMware Host Client to exit maintenance mode
  3. Power up the vCenter server
  4. Power up the other virtual machines

Just a quick note, during the powering on of the ESXi hosts, Virtual SAN will check all the data objects, so whilst these checks are performed some objects or VMs may report as inaccessible from the vCenter UI, once Virtual SAN has performed its checks, the VMs will be readily available again.


Microsoft Windows Failover Clustering on Virtual SAN

In Virtual SAN 6.1 (vSphere 6.0U1) it was announced that there is full support for Oracle RAC, Microsoft Exchange DAG and Microsoft SQL AAG, I quite often get asked about the traditional form of Windows Clustering technology which is often referred to as Failover Cluster Instance (FCI).? In the days of Windows 2000/2003 this was called Microsoft Cluster Service (MSCS) and from Windows 2008 onwards it became known as Windows Failover Clustering, FailoverClustertypically this would consist of 1 Active node and 1 or more Passive nodes using a shared storage solution as per the image on the left.

When creating a failover cluster instance in a virtualised environment on vSphere the concept of shared storage is still a requirement, this could be achieved in one of two ways:

Shared Raw Device Mappings (RDM) – Where one or more physical LUNs are presented as a Raw Device to the cluster virtual machines either in Physical or Virtual Compatibility Mode, the Guest OS would write a file system directly to the LUNs.

Shared Virtual Machine Disks (VMDK) Where one or more VMDKs are presented to the cluster virtual machines.


With both MSCS and FCI all the virtual machines involved in the cluster would need to have their Virtual SCSI Adapter (where the shared RDMs or VMDKs are being attached) set to SCSI BUS Sharing in order to allow both VMs to access the same underlying disk, this would also allow the SCSI-2 (MSCS) and SCSI-3 (FCI) reservations to be placed on the disks by the clustering mechanism.

Now since Virtual SAN is not a distributed file system, and a disk object could be placed across multiple disks and hosts within the Virtual SAN cluster, the SCSI-2 and SCSI-3 reservation mechanism is non-existent, so the ability to use SCSI BUS Sharing will not work, remember each capacity disk in Virtual SAN is an individual contributor to the overall storage.? With Virtual SAN it is possible to create an MSCS/FCI by using the in guest Software iSCSI, to accomplish this we need the cluster nodes as well as an iSCSI target, the iSCSI Target will have VMDKs assigned to it like so:iSCSITarget

In the example to the right there are four VMDKs assigned, the first VMDK is the OS disk for the iSCSI Target and the other three disks are going to be used as the cluster shared disks, there is no need to set these disks to any type of SCSI BUS Sharing as the in guest iSCSI Target will manage these disks directly.? The Underlying VMDKs will still have a Virtual SAN Storage policy applied to them, so FTT=1 for example will create a mirror copy of the VMDKs somewhere else within the Virtual SAN Cluster.

The Cluster nodes themselves would be standard Windows 2003 / 2008 / 2012 virtual machines with the Software iSCSI Initiator enabled and used to access the LUNs being presented by the iSCSI Target, again since the in guest iSCSI will manage the LUNs directly there is no need to share VMDKs or RDMs using SCSI BUS Sharing on the virtual machine SCSI adapter, the Cluster nodes themselves can also reside on Virtual SAN, so you would typically end up with each of the cluster virtual machines accessing the shared storage via their in guest iSCSI initiator

MSCSLooksLikeSince each of the cluster nodes also reside on Virtual SAN, their OS disk can also have a storage policy defined, performing an MSCS / FCI this way does not infringe on any supportability issues as you are not performing anything you should not be from either a VMware or Microsoft perspective.? All the SCSI-2 / 3 Persistent reservations are handled within the iSCSI Target without hitting the Virtual SAN layer so providing the Guest OS for the iSCSI target supports this then there should be no issue and the MSCS/FCI should work perfectly, it is also worth noting that Fault Tolerance is supported on Virtual SAN 6.1, this could be used to protect the iSCSI Target VM compute against a host failure.

In my testing I used a Ubuntu Virtual Machine as well as a Windows Storage Server OS as the iSCSI Target virtual machine and Windows 2003/2008/2012 as the Clustering virtual machines hosting a number of cluster resources such as Sharepoint, SQL and Exchange.  At the time of writing this is not officially supported by VMware and should not be used for Production use.

As newer clustering technologies come along, I see the requirement for a failover cluster instance to disappear, this is already happening with Exchange DAG and SQL AAG as the nodes replicate between themselves which mitigates the need for a shared disk between the nodes

One question I do get asked is how we support Oracle RAC on Virtual SAN as that uses shared disks also?? The answer to that is unlike MSCS/FCI which uses SCSI BUS Sharing, Oracle RAC uses the Multi Writer option in a virtual machine, Oracle RAC has a distributed write capability and it handles the simultaneous writes from different nodes internally to avoid data loss.? For further information on setting up Oracle RAC on Virtual SAN, please use KB Article 2121181


It's all about VMware vSAN