Disk failure testing on LSI Based Virtual SAN RAID0 controllers

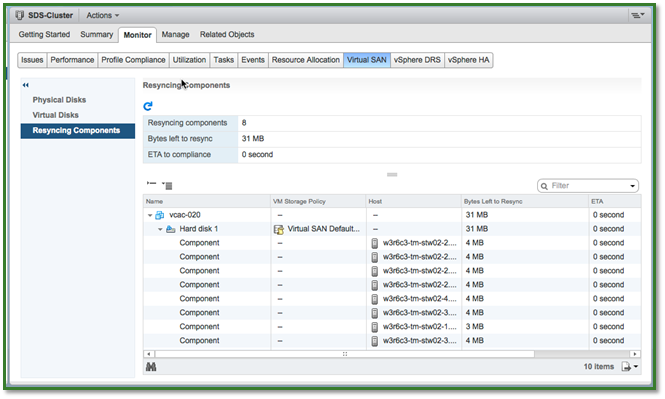
Disk failure testing can be an integral part of a Proof of Concept, you want to ensure that Virtual SAN behaves in the correct way right?? In this post I shall talk about how to successfully perform disk failure testing on LSI Based RAID0 controllers in order to help you validate the behaviour expected from Virtual SAN.? Before I do that, I have seen many instances where people are attempting to simulate a disk failure by pulling a disk out of the backplane slot and not seeing what they expect to be expected behaviour, pulling a disk is not the same as an actual disk failure, Virtual SAN will mark a pulled disk as absent and will wait for the value of ClomRepairDelay (which the default is 60 minutes) before starting a rebuild of components residing on that disk.? With a failed disk Virtual SAN will rebuild components residing on that disk immediately, so you can now see the expected behaviour in the two different scenarios.

So how do we perform disk failure testing on an LSI Based RAID 0 controller?? Let’s first of all look at the different options we have


Health UI Plugin

In Virtual SAN? 6.0 there is the option to deploy the Health UI Plugin, this plugin for vCenter has a secondary routine that will deploy out components onto the ESXi host to allow them to report back to the the plugin on any issues that are seen, another part of this is the Error Injection routine that allows the user to inject a temporary or permanent device failure and also clear the injected error, for details on how to use the error injection, please refer to my post on Using the Error Injection Tool in the Virtual SAN 6.0 Health UI plugin to simulate a disk failure, for VSAN 5.5 users this feature is not available.


LSI based ESXi command line tools

LSI have a utility that is deployable on an ESXi host th manipulate and make changes to their controllers without having to go into the controller BIOS, the utility is very powerful and allows you to perform functions such as:

  • Create or Destroy a RAID Virtual Disk
  • Change cache policies
  • Change the status of Virtual Disks
  • Block access to Virtual Disks
  • Import Foreign Config

Please note: For the latest version of StorCli please visit the LSI Website for MegaCli please visit your server vendor website

Above are just a few examples of things that you can do using the command line tools.? Depending on who the OEM is for your LSI Based card, you would either use StorCLI or MegaCLI, we will cover both command sets for performing the same operation, for the cross references, I used this document from LSI, So which command option do we use to simulate a disk failure?

The obvious choice would be to set a RAID virtual disk or a Physical disk into an Offline state, before I seen the behaviour of doing this first hand I would have agreed 100%, however after seeing what happened after doing this made me look further at other options of achieving the same thing, but the question you may be asking is why would this not work?

When placing a RAID disk or Physical disk into an Offline state, what I observed in the ESXi logs is that there was no SCSI sense codes being received by the host from the controller, I could see a Host Side NMP Error of H:0x1 which equates to a No-Connect and the action from that is to failover, the disk was marked as Absent in the Virtual SAN UI but not failed, so obviously this is not what we wanted to achieve.? After a bit more digging and testing I finally stumbled across an option which after testing a few times resulted in the correct behaviour, so what was the option?

> storcli /c0 /v2 set accesspolicy=blocked

In the above command I am selecting Controller 0 with the /c0 option, and Virtual Disk 2 with the /v2 option, what this did is block access to the RAID Virtual Disk and send SCSI Sense Code information to the ESXi host which was:

  • Device Side NMP Error D:0x2 = Check Condition
  • SCSI Sense Code 0x5 = Illegal Request
  • ASC 0x24 = Invalid Field in CDB
  • ASC 0x25 = Logical Unit not Supported

This resulted in the disk being reported as Failed which was the expected behaviour, the desired command for MegaCli is as follows:

> MegaCli -LDSetProp -Blocked -L2 -a0

Where -a0 is the adapter number and -L2 is the Logical Drive number (Virtual Disk)

After the disk failure testing has been completed, in order to remove the blocked access to the Virtual Disk you issue the following StorCli command:

> storcli /c0 /v2 set accesspolicy=RW

And in MegaCli

> MegaCli -LDSetProp -RW -L2 -a0

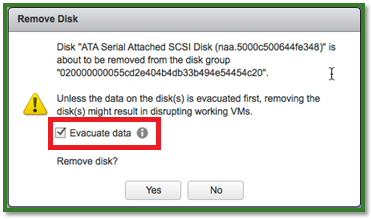
After you have re-allowed access to the Virtual disk you will need to go into the Virtual SAN UI and remove the affected disk from the disk group and re-add it back in, the same applies if you was performing the failure test on the SSD that heads a disk group, only this time you will have to remove the whole disk group and re-add, after all you have just in effect replaced a failed disk 🙂

Using the error injection command to test a disk failure

As part of the Health UI Plugin in Virtual SAN 6.0 comes a a feature that allows users to simulate a Magnetic Disk or SSD disk failure by injecting an error to the device, this is a feature that I have used a number of times with customers as part of their Proof of Concept and works extremely well to fully validate the behaviour of Virtual SAN under disk or SSD failure conditions, the command line tool can inject two types of errors:

  • Permanent device error
  • Transient device error which you can specify a timeout value

Before I go into further detail I would just like to say that this should only be used in a pre-production environment for example a Proof of Concept


Tool location

The actual tool is a python script called vsanDiskFaultInjection.pyc and is located in the following folder on ESXi after deploying the health UI plugin

/usr/lib/vmware/vsan/bin

You can run the following command which will give you all the command line options available with the tool:

[root@vsan01/usr/lib/vmware/vsan/bin] python vsanDiskFaultInjection.pyc -h
Usage:
      vsanDiskFaultInjection.pyc -t -r error_durationSecs -d deviceName
      vsanDiskFaultInjection.pyc -p -d deviceName
      vsanDiskFaultInjection.pyc -c -d deviceName

Options:
-h, --help           Show this help message and exit
-u                   Inject hot unplug
-t                   Inject transient error
-p                   Inject permanent error
-c                   Clear injected error
-r ERRORDURATION     Transient error duration in seconds
-d DEVICENAME,--devicename=DEVICENAME

The workflow I typically use for this would be as follows:

  1. Identify the disk device you wish to inject the error
  2. Inject a permanent device error to the chosen device
  3. Check the resync tab in the Virtual SAN UI
  4. Once the resync operations have completed clear the injected error
  5. Remove the disk from the disk group (untick the option to migrate data)
  6. Add the disk back to the disk group

Please note: If you perform these steps on the SSD which heads a disk group this will result in the failure of a whole disk group, it will be necessary to remove the disk group and create a new one after the error injection is cleared


Step 1. Identify the disk device you wish to inject the error
I always use the command esxcli vsan storage list as this command only lists disks that are associated with Virtual SAN for the host that the command is being ran against, this also gives you other bits of information such as Disk Type, Disk Group Membership and all importantly the device name, for example:
naa.5000c50062ae5b8f:
?? Device: naa.5000c500644fe348
?? Display Name: naa.5000c500644fe348
?? Is SSD: false
?? VSAN UUID: 52207038-8011-a1f2-4dda-b7726c1446ac
?? VSAN Disk Group UUID: 523afae5-baf1-e0a4-9487-8422087d486b
?? VSAN Disk Group Name: naa.5000cca02b2f9ab8
?? Used by this host: true
?? In CMMDS: true
?? Checksum: 3819875389982737025
?? Checksum OK: true
?? Emulated DIX/DIF Enabled: false

naa.5000c50062abc3ff:
?? Device: naa.5000c50062abc3ff
?? Display Name: naa.5000c50062abc3ff
?? Is SSD: false
?? VSAN UUID: 522fdad4-014f-fae9-a22b-c56b9506babe
?? VSAN Disk Group UUID: 52e6f997-8d6c-732a-9879-e37b454dbc39
?? VSAN Disk Group Name: naa.5000cca02b2f7c18
?? Used by this host: true
?? In CMMDS: true
?? Checksum: 15273555660141709779
?? Checksum OK: true
?? Emulated DIX/DIF Enabled: false

naa.5000c50062ae1cc7:
?? Device: naa.5000c50062ae1cc7
?? Display Name: naa.5000c50062ae1cc7
?? Is SSD: false
?? VSAN UUID: 5235241c-0e95-97e2-2c82-8cef75ce7944
?? VSAN Disk Group UUID: 52e6f997-8d6c-732a-9879-e37b454dbc39
?? VSAN Disk Group Name: naa.5000cca02b2f7c18
?? Used by this host: true
?? In CMMDS: true
?? Checksum: 4356104544658285915
?? Checksum OK: true
?? Emulated DIX/DIF Enabled: false

naa.5000cca02b2f9ab8:
?? Device: naa.5000cca02b2f9ab8
?? Display Name: naa.5000cca02b2f9ab8
?? Is SSD: true
?? VSAN UUID: 523afae5-baf1-e0a4-9487-8422087d486b
?? VSAN Disk Group UUID: 523afae5-baf1-e0a4-9487-8422087d486b
?? VSAN Disk Group Name: naa.5000cca02b2f9ab8
?? Used by this host: true
?? In CMMDS: true
?? Checksum: 7923014052263251576
?? Checksum OK: true
?? Emulated DIX/DIF Enabled: false

naa.50000395e82b640c:
?? Device: naa.50000395e82b640c
?? Display Name: naa.50000395e82b640c
?? Is SSD: false
?? VSAN UUID: 525da647-7086-0daf-f68d-bd97a10926b3
?? VSAN Disk Group UUID: 523afae5-baf1-e0a4-9487-8422087d486b
?? VSAN Disk Group Name: naa.5000cca02b2f9ab8
?? Used by this host: true
?? In CMMDS: true
?? Checksum: 16797787677570053813
?? Checksum OK: true
?? Emulated DIX/DIF Enabled: false

naa.5000cca02b2f7c18:
?? Device: naa.5000cca02b2f7c18
?? Display Name: naa.5000cca02b2f7c18
?? Is SSD: true
?? VSAN UUID: 52e6f997-8d6c-732a-9879-e37b454dbc39
?? VSAN Disk Group UUID: 52e6f997-8d6c-732a-9879-e37b454dbc39
?? VSAN Disk Group Name: naa.5000cca02b2f7c18
?? Used by this host: true
?? In CMMDS: true
?? Checksum: 16956194795890120879
?? Checksum OK: true
?? Emulated DIX/DIF Enabled: false


Step 2. Inject a permanent device error to the chosen device

For this I am going to choose naa.5000c500644fe348 which is a Magnetic Disk from disk group naa.5000cca02b2f9ab8

[root@vsan01/usr/lib/vmware/vsan/bin] python vsanDiskFaultInjection.pyc -p -d naa.5000c500644fe348
Injecting permanent error on device vmhba0:C0:T1:L0
vsish -e set /reliability/vmkstress/ScsiPathInjectError 0x1
vsish -e set /storage/scsifw/paths/vmhba0:C0:T1:L0/injectError 0x0311030000000


Step 3. Check the resync tab in the Virtual SAN UI

resyncstatus


Step 4. Once the resync operations have completed clear the injected error

[root@vsan01/usr/lib/vmware/vsan/bin] python vsanDiskFaultInjection.pyc -c -d naa.5000c500644fe348
Clearing errors on device vmhba0:C0:T1:L0
vsish -e set /storage/scsifw/paths/vmhba0:C0:T1:L0/injectError 0x00000
vsish -e set /reliability/vmkstress/ScsiPathInjectError 0x00000


Step 5. Remove the disk from the disk group (untick the option to migrate data)

It is important in this step to untick the option to evacuate data, because the disk has been failed and data has been rebuilt elsewhere in the cluster there is no data to evacuate, leaving this option ticked will result in a failure message informing you that the task failed, note: if you are performing the test on an SSD that is the cache for a disk group then the removal of the disk group is required

Disk Removal

Note: The disk group in the UI corresponds only to the UI and this is why it differs from the disk group name on the ESXi command line


Step 6. Add the disk back to the disk group


There we have it, disk failure testing in Virtual SAN made simple with the Error Injection Tool which is part of the Virtual SAN Health UI Plugin, I use this all of the time when assisting customers with Proof of Concepts on Virtual SAN, it makes my life and the customers life so much easier and allows the workflow to be much faster too, remember……Pre-Production only folks, I am not responsible for you doing this in a production environment 🙂


VMware Virtual SAN Assessment Tool

Virtual SAN has been around for well over 12 months now, and with the features that were packed into version 6 which was released in March 2015 some people still question if Virtual SAN will be a fit into their existing infrastructure, well that’s where this latest and greatest tool from VMware comes in, the Virtual SAN Assessment Tool, firstly let’s take a look at what the tool actually is:

  • Free SaaS tool that can identify applications, workloads or VMs where there would be a benefit to using Virtual SAN
  • The tool collects and analyzes data from the current vSphere environment such as I/O patterns
  • The tool can be configured to run for a few hours, days or even weeks, the minimum recommendation is 7 days
  • Gives you a holistic overview of VMs that are suited and are not suited to Virtual SAN and size requirements for the proposed Virtual SAN environment

Workflow

Like any assesment tool it has to be used properly and by the correct people, the correct workflow would be

  1. VMware or Partner/Reseller invites the customer to participate in the VSAN Assessment
  2. Customer registers in the portal and is given the download link to the Collector Appliance
  3. The customer deploys and configures the data collector
  4. Recommendation to run the assesment for at least 7 days
  5. VMware/Partner and the customer review the assessment data

assessment Tool Components

The assesment tool itself only requires two components, the Collector Appliance and the VMware VIP (VMware Infrastructure Planner) Portal, the appliance itself would be downloaded from the VMware website during the Assessment Tool signup process, the appliance is around 1.0GB in size, so not all that big, once running the appliance uploads data via HTTPS to the portal and at the end of the period of assessment the data is made available at the same portal, the following image explains this graphically

VSAN Assessment Data Flow

Results

At the end of the assesment the results are analyzed and presented to you on the VIP Portal, an example of the results are shown below:

VSAN Assessment Results1

The above example shows us:

  • Out of the 52 Virtual Machines assessed, 46 of them were a good fit for Virtual SAN Hybrid
  • 19 Virtual Machines were excluded from the assessment out of the total 71 because they were powered off
  • Data was collected for 1 day….obviously this was a test
  • Peak Cache Size
  • The minimum usable capacity

For All Flash the results are slightly different:

VSAN Assessment Results3

This tells us that:

  • This time all the virtual machines that were assessed would be suitable for an All-Flash Virtual SAN configuration, so obviously the 6 virtual machines that did not suite a Hybrid Virtual SAN in the previous image had a workload that needed a much lower response time
  • The SSD Size for the Writer Cache tier has been calculated as a recommendation
  • 19 VMs were excluded because they were powered off

The report even gives us information as to how much of a fit the VM is for Virtual SAN:

VSAN Assessment Results2

Once the results are analysed with VMware/Partner and the Customer a definitive specification of cluster capacity and size can be easily achieved based on these results.


The results will also allow you to click on the Virtual SAN TCO Calculator and pre-populate the information for you, so no more “Finger in the air” trying to guess what values to put where, it does it all for you

Conclusion

The Virtual SAN assessment tool will offer customers a more granular approach to see how Virtual SAN will help them with their current vSphere infrastructure, it offers results in a clean graphical way that is easy to decypher and will allow Vendors/Partners to scope more accurately the hardware requirements.? I personally will be using this with customers.? If you wish to use the tool if you are looking to move to Virtual SAN, reach out to your hardware vendor or VMware Systems Engineer


It's all about VMware vSAN