All posts by MrVSAN

Configuring iSCSI on vSAN 6.5

One of the new features of vSAN 6.5 is iSCSI access, so before I talk about how to configure iSCSI on vSAN let me just cover what is meant by iSCSI on vSAN to avoid any confusion 🙂

As we know, vSAN is an object based storage system, everything that exists on vSAN is an object that has a storage policy applied to is via Storage Policy Based Management, in vSAN 6.2 the vSAN performance metrics are stored on vSAN as an object also, so vSAN is already gearing up for other types of objects and not just a file system for running virtual machines.? The iSCSI side of vSAN is no different, the iSCSI Target has a home folder object just like a virtual machine, and each iSCSI LUN created has it’s own object, just like a VMDK does for a virtual machine.? The main use cases for vSAN are as follows:

  • Physical Workloads
  • In virtual machine Software iSCSI (as at the time of writing this, it will be supported in a future release)
  • Microsoft Cluster Service (MSCS) and Windows Failover Cluster Instance (FCI) (as at the time of writing this, the MSCS/FCI will be supported in a future release)

VMware does not allow the presenting of iSCSI LUNs on vSAN to other vSphere clusters, when I sit back and think about that statement I can see a few reasons for this

  • There is no SATP in ESXi for vSAN iSCSI
  • You lose the whole functionality Storage Policy Based Management for your virtual machines
  • You end up defeating the object of vSAN and start placing all of your Virtual Machines back onto LUNs again


So how do we configure iSCSI on vSAN?? Well just like the whole simplicity around vSAN, iSCSI is no different and is extrmely simple to set up, for the purpose of the test I used a Windows 2012 Server Virtual Machine and the iSCSI Initiator Service in Windows

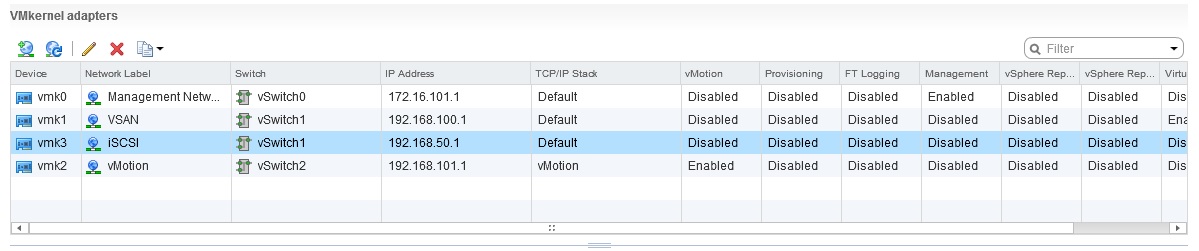
Step 1 – Create an iSCSI VMKernel Interface
This interface will be used for iSCSI communication to allow the iSCSI traffic to flow over to our Physical or even Virtual Machines

step-1-iscsi-vmkernel-interface

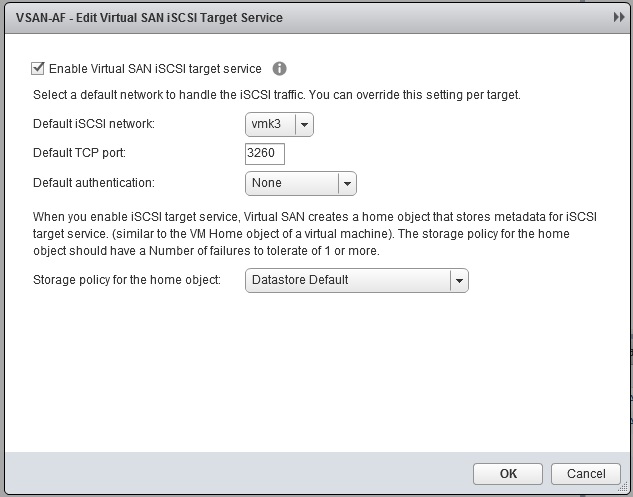
Step 2 – Enable the iSCSI Service on vSAN

step-2-enable-iscsi-target-service

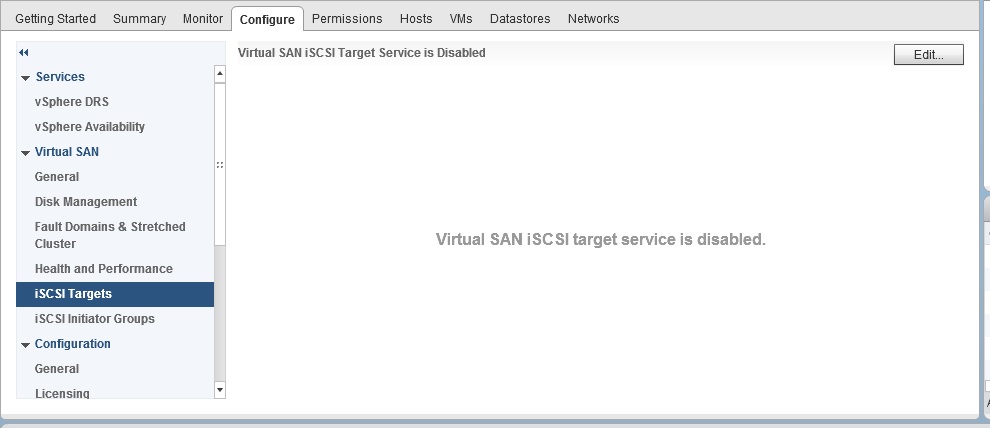
Suring the enabling you are presented with various options:

  • VMKernel Interface
  • TCP Port Number
  • Authentication Method (CHAP and Mutual CHAP suupported)
  • The Storage Policy to be applied to the Home Object for the iSCSI Target

step-3-select-vmkernel-interface


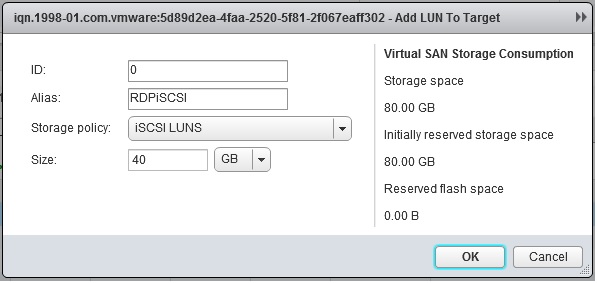
Step 4 – Create an iSCSI LUN
For this I am creating an iSCSI LUN with a storage policy I have specified where my iSCSI LUNs are 100% Space reserved as per my Storage Policy, when creating the LUN it gives you an example on the right hand side of what this looks like from a vSAN Perspective, since I am using RAID1 – FTT=1, my 40GB LUN Object will consume 80GB of space and will be 80GB Reserved as per the policy

step-4-create-iscsi-target-and-lun

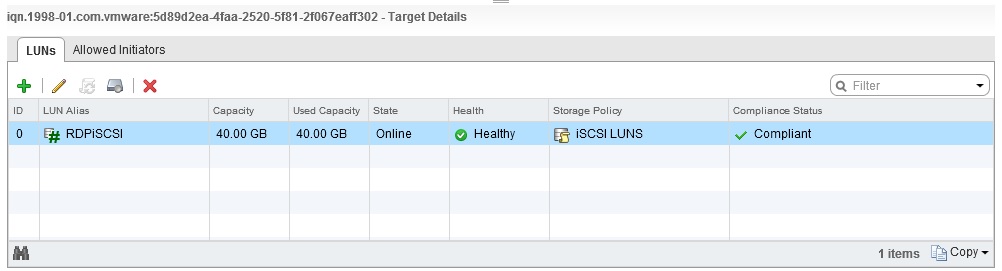
After this my display shows the LUN as being created and storage policy compliant

step-4b-lun-display

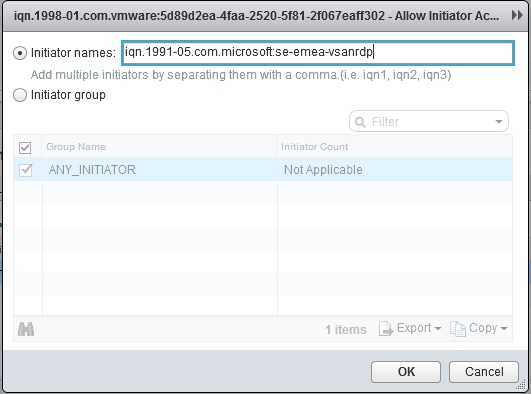
Step 5 – Add an Initiator or Initiator Group to the LUN Object
Before the Virtual Machine can see the LUN, I need to add the Initiator for the VM into the Allowed Initiators, I copied the initiator name from my virtual machine and pasted it in here

step-5-add-initiator

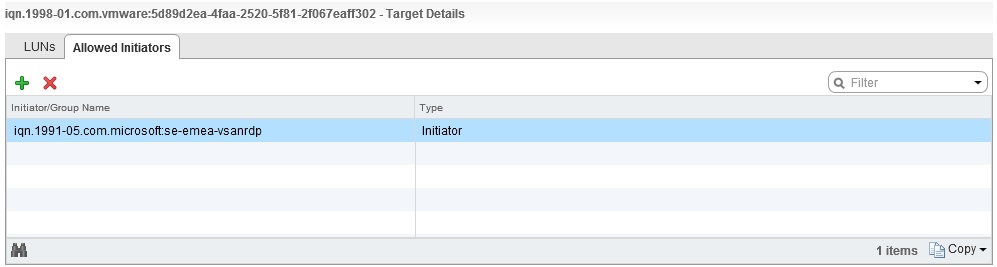
And the display shows this as now being added

step-5a-add-initiator


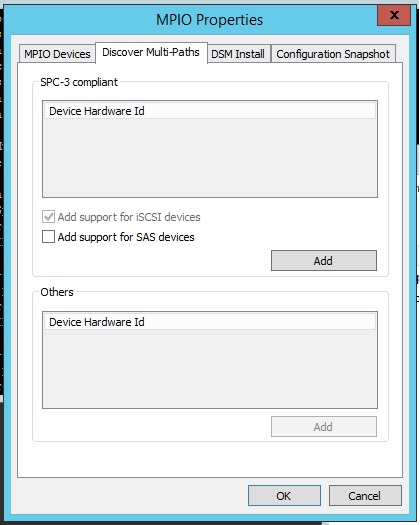
From a vSAN perspective this is the iSCSI configuration completed, so now I need to go to my Windows virtual machine and configure the iSCSI Initiator side of things, so the first thing I need to do is enable MPIO for iSCSI, this is listed in Windows 2012 under Administrative Tools, ensure the “Add support for iSCSI devices” is selected

step-6-enable-mpio-for-iscsi

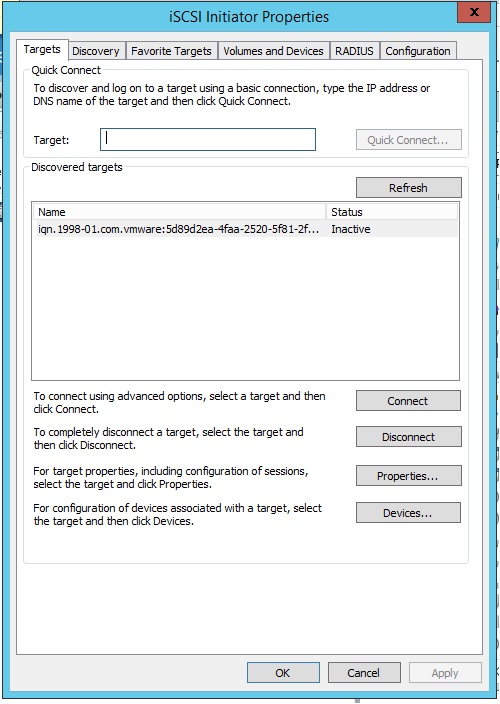
Once I have MPIO configured for iSCSI Devices it is time to add my iSCSI Target, for this you need to go into Adminisrative Tools and select the iSCSI Initiator service, once in there go to the “Discovery Tab” and enter the IP Address of your iSCSI Target, in my setup the iSCSI Target was being hosted by host 2 and for this the iSCSI IP is 192.168.50.2

step7-add-portal


Configure any advanced settings for example if you are using CHAP/Mutual CHAP, then click on the “Targets” tab and you will see your Target IQN as “Inactive”, click on Connect

step7a-add-portal

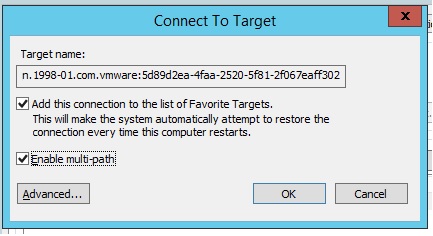
In here select “Enable Multi Path”

step7b-add-portal

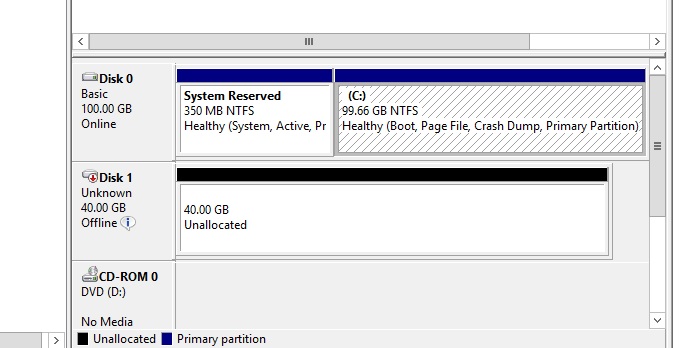
Once connected I can now see my 40GB LUN in Device Manager and also in Disk Management, in Device Manager it is listed as “VMware Virtual SAN Multi-Path Disk Device”…..yes I know it’s no longer called Virtual SAN

step-8-device-manager

step-9-disk-management


That’s your iSCSI Configured on vSAN and also connected the LUN to a Windows 2012 Server, like I said, very easy to do

Virtual SAN – Easy to Use Proactive Tests

Since VMware introduced Virtual SAN back in March 2014 there have been a number of enterprise class features and enhancements, one of which was the Health UI, incorporated into the Health UI is a section called Proactive Tests which can be used to perform functionality testing and performance testing, there are three areas for the Proactive Tests they are:

  • VM Creation Test
  • Multicast Performance Test
  • Storage Performance Test
Proactive Tests
Proactive Tests Screenshot

The tests themselves are a good way to test that your cluster configuration is correct and complete, so what does each one of the tests do?

VM Creation Proactive Test

The VM Creation test is a simple deployment of a small sized virtual machine on each host within the cluster you have created, the test is designed to validate that:

  • Most aspects of the Virtual SAN configuration are completed
  • The whole management stack and Virtual SAN network is correctly defined and configured

The results of the test is passed through to the UI to help identify potential mis-configuration issues if the test fails to complete, in order for the result to be passed through as a pass, all hosts must return a success.

Multicast Performance Proactive Test

We all know that part of the networking requirements for Virtual SAN is Multicast, it is required from a cluster management perspective and not from a data flow perspective, it is pretty difficult if you are not in charge of your network infrastructure to perform a Multicast test on the network to make sure all is correct.? This test will actually perform a multicast test between all hosts and measure the speed, there are three levels of status with the multicast test and they are:

  • Failed – One or more hosts produced a multicast performance test of 20MB/Sec or below
  • Warning – One or more hosts produced a multicast test result of More than 20MB/Sec but less than 50MB/Sec
  • Passed – All hosts produced a multicast performance test result exceeding 50MB/Sec

Like the VM Creation test, the results are passed through to the UI depending on the above success criteria.? This allows you to check that your network supports multicast as well as the performance of multicast on the physical network.

Storage Performance Proactive Test

I personally like playing around with this one in my all-flash lab with different RAID levels and different performance profiles, I also use this a lot with customers just after they have set up their environment for a proof of concept, it allows you to get a baseline of performance for the cluster and troubleshoot any mis-configuration prior to running the proof of concept that could affect the performance.

Within this test, you can select the duration of the test, the storage I/O profile as well as the policy that is to be used for the storage performance test which is a huge advantage to be able to test different storage policies and the performance that they will give based on the definitions you specify in each policy

VSAN Proactive Storage Text

So apart from being able to choose how long to run the test for and the storage policy used for the test, what about the workload itself?? Well in the workload there are a number of tests that you can perform, there are enough tests to be able to generate a workload to simulate most real world workloads out there today, under the tests I have performed, it is pretty clear that the Storage Performance test here is pretty I/O intensive and after running the tests a few times it was clear that the tests also use 4K block sizes.? So what are the options in the Workload types?

Basic Tests

  • Low Stress Test – This workload will deploy a single disk object per host in the cluster and perform just a generic low utilization stress test on all the disk objects at the same time, this is one of the only test that utilizes a single object per host for testing and is not very I/O intensive
  • Basic Sanity Test, focus on Flash cache layer – Just like the Low Stress Test this will also deploy a single object per host and perform a sanity test which will as it states, focus on the cahe layer of the Virtual SAN storage, this test is more suited to Hybrid where there is a read cache tier

Intensive Tests

Apart from the two tests above, all the rest of the tests are designed to be I/O intensive and will show what capabilities your Virtual SAN cluster will deliver, each of the workloads below will deploy mutiple objects per host within the cluster and perform the test on them all at the same time, so be warned:

  • Stress Test – Like the Low Stress Test, this test will perform the same test but with 20 objects per host as opposed to a single object per host in the Low Stress Test and will also use a I/O block size of 8K
  • Performance characterization – 100% Read, optimal RC usage – This test is designed to test the performance of the read cache in a Hybrid cluster
  • Performance characterization – 100% Write, optimal WB usage – This test is deigned to test the write buffer in both Hybrid and All-Flash clusters
  • Performance characterization – 100% Read, optimal RC usage after warmup – This test will perform the same as the Optimal RC usage test, however it will not perform the test until the cache has been warmed up first, this will allow Virtual SAN to see what blocks are regularly being accessed in order to cache them
  • Performance characterization – 70/30 read/write mix, realistic, optimal flash cache usage – For most workloads this will be the test most commonly used
  • Performance characterization – 70/30 read/write mix, realistic, High I/O Size, optimal flash cache usage – This test uses a 64K block size for I/O testing
  • Performance characterization – 100% read, Low RC hit rate / All-Flash Demo – This will show the real Read performance of your All-Flash environment very well, I have used this test many times in my All-Flash environment
  • Performance characterization – 100% streaming reads – A test that would be the equivalent of streaming content from Virtual SAN via multiple sessions
  • Performance characterization – 100% streaming writes – A test that would be the equivalent of multiple video surveillance cameras streaming data to Virtual SAN

After the test has completed, the results will be displayed in the window below the test options like the following, as you can work out from my results below, the test I performed was for the High I/O Size as the MB/s divided by IOPS gives a block size of around 64K

VSAN Storage Performance Results

If we look at out performance charts for the same period of time we can see that the IOPS was over 88,000 for the cluster at 64K Block Size and a throughput of 5.4GB/second (43.2Gbps)

VSAN 64K IOPS Graphs

If we do the same for the All-Flash Demo these are the results based on the profile “Performance characterization – 100% read, Low RC hit rate / All-Flash Demo”

VSAN Storage Performance Results-AF

Again if we look at out performance charts for the same period of time we can see that the IOPS was over half a million for the cluster at 4K Block Size

VSAN IOPS Graphs-AF

Customers always ask me how realistic these tests are, I have done some comparisons with HCIBench also, and so have some of my customers, and HCIBench produces the same results, so as you can see the Virtual SAN Proactive Tests can save you a lot of time and effort with regards to things like storage performance testing, and remember they are very I/O intensive, coupled with the new performance monitoring charts in Virtual SAN, you have more tools at your fingertips all within a single user interface.

Enjoy 🙂


Drivers and Firmware Requirements

Out of all the conversations I have surrounding Virtual SAN with Customers, Partners and VMware folks, there is one topic that always surfaces and that topic is with regards to what drivers and firmware to use, is it the minimum version on the compatibility guide or what?? As we know Virtual SAN has a specific HCL when it comes down to three components

  • Disk Controller (VSAN RAID0 and Passthrough)
  • Solid State Drives
  • Magnetic Disks

So where does the confusion come from?

Historically, the compatibility guide for ESXi has always been supported as what was certified by the vendor, and anything newer than that is perfectly acceptable, but in the case of Virtual SAN this all changed, especially for the disk controller, and this is due to the whole interaction between Virtual SAN and the controller that the slightest change in firmware could result in a behavioural change on the controller which could have negative consequences on the Virtual SAN environment.? With Virtual SAN the hardware vendors will certify specific combinations of drivers and firmware, for example here

Virtual SAN Drivers and Firmware

You will see that the controller listed here for ESXi 5.5U3 (Virtual SAN 5.5) has two different drivers and associated firmware versions, this is the explicit combination that is required, so for example it would not be supported to use the driver version highlighted in red megaraid_perc9 version 6.901.55.00.1vmw with the firmware version highlighted in blue 25.3.0.0016 and vice versa, this is the exact firmware combination that must be used.? So if you update the firmware of the controller, you need to also ensure you apply the correct driver version also.

So what about newer versions you might ask?? Sometimes vendors will release newer Drivers and Firmware to provide fixes to known issues or enhancements to the controller, until that newer driver/firmware has been certified for Virtual SAN you should not upgrade to them, the chances are that it is in the process of being certified but until you see it on the Virtual SAN Compatibility Guide do not upgrade.? Stay Safe…..Stay Supported!

With regards to the Solid State Drives and Magentic disks, on the Virtual SAN Compatibility Guide you will see a firmware version published (Not in all cases for Magnetic disks), like the traditional ESXi Compatibility Guide, this is the minimum firmware supported, so as vendors produce newer firmware for them, you can update them as you wish, just remember to be on or above the mimumum published on the Virtual SAN Compatibility Guide

So just remember that:

  • Disk Controller – The exact driver / firmware combination on the Virtual SAN Compatibility Guide
  • Solid State Disks and Magnetic Disks – The firmware published on the Virtual SAN Compatibility Guide is the minimum version supported

Virtual SAN Compatibility Guide – Component Based