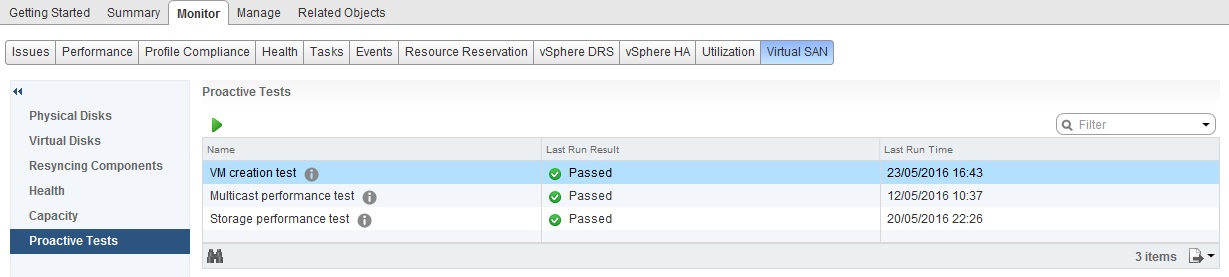
Since VMware introduced Virtual SAN back in March 2014 there have been a number of enterprise class features and enhancements, one of which was the Health UI, incorporated into the Health UI is a section called Proactive Tests which can be used to perform functionality testing and performance testing, there are three areas for the Proactive Tests they are:
- VM Creation Test
- Multicast Performance Test
- Storage Performance Test
The tests themselves are a good way to test that your cluster configuration is correct and complete, so what does each one of the tests do?
VM Creation Proactive Test
The VM Creation test is a simple deployment of a small sized virtual machine on each host within the cluster you have created, the test is designed to validate that:
- Most aspects of the Virtual SAN configuration are completed
- The whole management stack and Virtual SAN network is correctly defined and configured
The results of the test is passed through to the UI to help identify potential mis-configuration issues if the test fails to complete, in order for the result to be passed through as a pass, all hosts must return a success.
Multicast Performance Proactive Test
We all know that part of the networking requirements for Virtual SAN is Multicast, it is required from a cluster management perspective and not from a data flow perspective, it is pretty difficult if you are not in charge of your network infrastructure to perform a Multicast test on the network to make sure all is correct.? This test will actually perform a multicast test between all hosts and measure the speed, there are three levels of status with the multicast test and they are:
- Failed – One or more hosts produced a multicast performance test of 20MB/Sec or below
- Warning – One or more hosts produced a multicast test result of More than 20MB/Sec but less than 50MB/Sec
- Passed – All hosts produced a multicast performance test result exceeding 50MB/Sec
Like the VM Creation test, the results are passed through to the UI depending on the above success criteria.? This allows you to check that your network supports multicast as well as the performance of multicast on the physical network.
Storage Performance Proactive Test
I personally like playing around with this one in my all-flash lab with different RAID levels and different performance profiles, I also use this a lot with customers just after they have set up their environment for a proof of concept, it allows you to get a baseline of performance for the cluster and troubleshoot any mis-configuration prior to running the proof of concept that could affect the performance.
Within this test, you can select the duration of the test, the storage I/O profile as well as the policy that is to be used for the storage performance test which is a huge advantage to be able to test different storage policies and the performance that they will give based on the definitions you specify in each policy
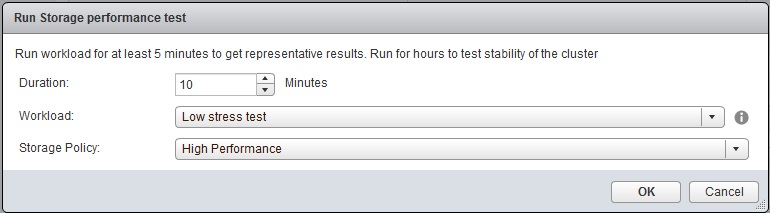
So apart from being able to choose how long to run the test for and the storage policy used for the test, what about the workload itself?? Well in the workload there are a number of tests that you can perform, there are enough tests to be able to generate a workload to simulate most real world workloads out there today, under the tests I have performed, it is pretty clear that the Storage Performance test here is pretty I/O intensive and after running the tests a few times it was clear that the tests also use 4K block sizes.? So what are the options in the Workload types?
Basic Tests
- Low Stress Test – This workload will deploy a single disk object per host in the cluster and perform just a generic low utilization stress test on all the disk objects at the same time, this is one of the only test that utilizes a single object per host for testing and is not very I/O intensive
- Basic Sanity Test, focus on Flash cache layer – Just like the Low Stress Test this will also deploy a single object per host and perform a sanity test which will as it states, focus on the cahe layer of the Virtual SAN storage, this test is more suited to Hybrid where there is a read cache tier
Intensive Tests
Apart from the two tests above, all the rest of the tests are designed to be I/O intensive and will show what capabilities your Virtual SAN cluster will deliver, each of the workloads below will deploy mutiple objects per host within the cluster and perform the test on them all at the same time, so be warned:
- Stress Test – Like the Low Stress Test, this test will perform the same test but with 20 objects per host as opposed to a single object per host in the Low Stress Test and will also use a I/O block size of 8K
- Performance characterization – 100% Read, optimal RC usage – This test is designed to test the performance of the read cache in a Hybrid cluster
- Performance characterization – 100% Write, optimal WB usage – This test is deigned to test the write buffer in both Hybrid and All-Flash clusters
- Performance characterization – 100% Read, optimal RC usage after warmup – This test will perform the same as the Optimal RC usage test, however it will not perform the test until the cache has been warmed up first, this will allow Virtual SAN to see what blocks are regularly being accessed in order to cache them
- Performance characterization – 70/30 read/write mix, realistic, optimal flash cache usage – For most workloads this will be the test most commonly used
- Performance characterization – 70/30 read/write mix, realistic, High I/O Size, optimal flash cache usage – This test uses a 64K block size for I/O testing
- Performance characterization – 100% read, Low RC hit rate / All-Flash Demo – This will show the real Read performance of your All-Flash environment very well, I have used this test many times in my All-Flash environment
- Performance characterization – 100% streaming reads – A test that would be the equivalent of streaming content from Virtual SAN via multiple sessions
- Performance characterization – 100% streaming writes – A test that would be the equivalent of multiple video surveillance cameras streaming data to Virtual SAN
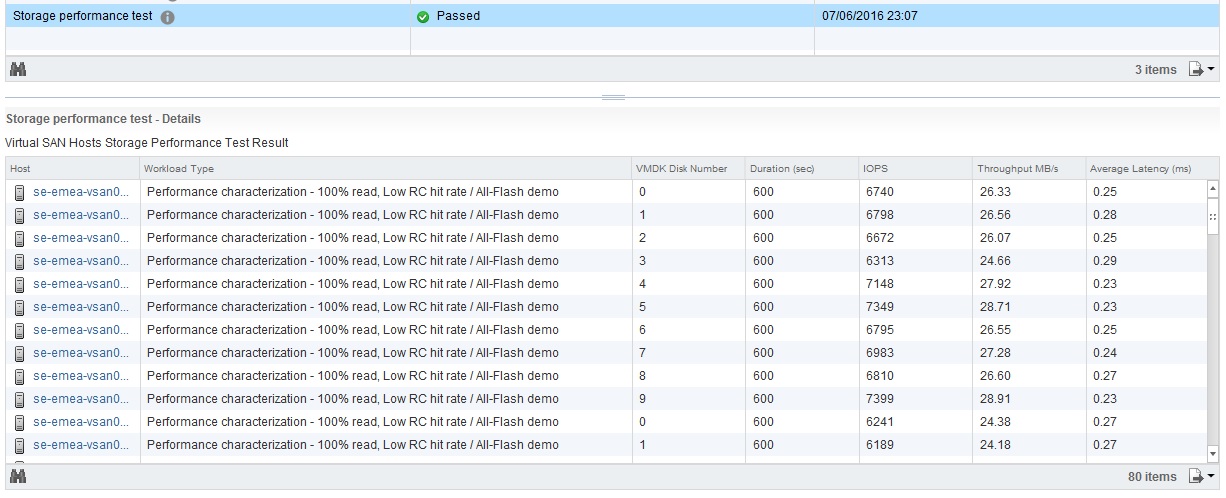
After the test has completed, the results will be displayed in the window below the test options like the following, as you can work out from my results below, the test I performed was for the High I/O Size as the MB/s divided by IOPS gives a block size of around 64K

If we look at out performance charts for the same period of time we can see that the IOPS was over 88,000 for the cluster at 64K Block Size and a throughput of 5.4GB/second (43.2Gbps)
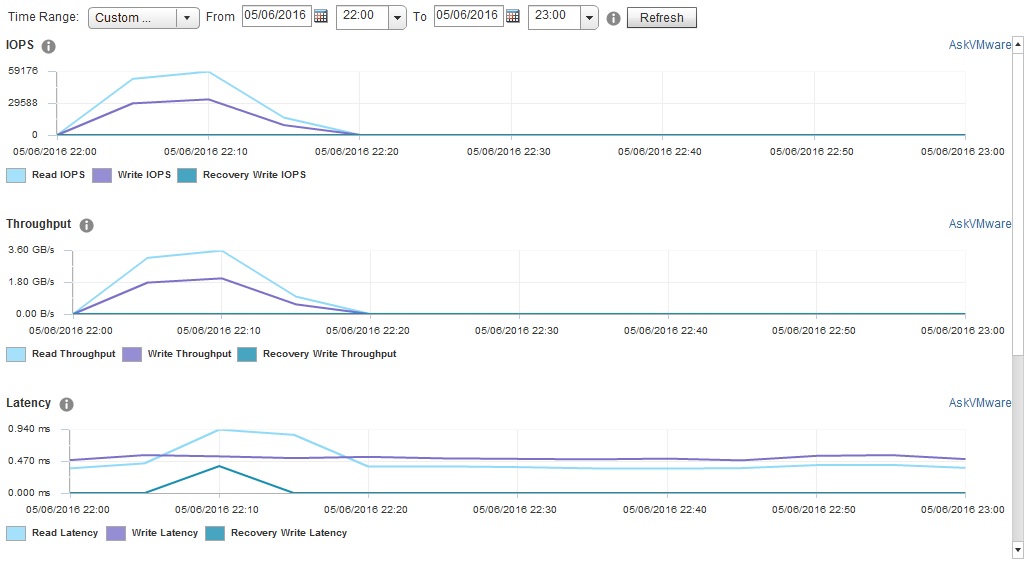
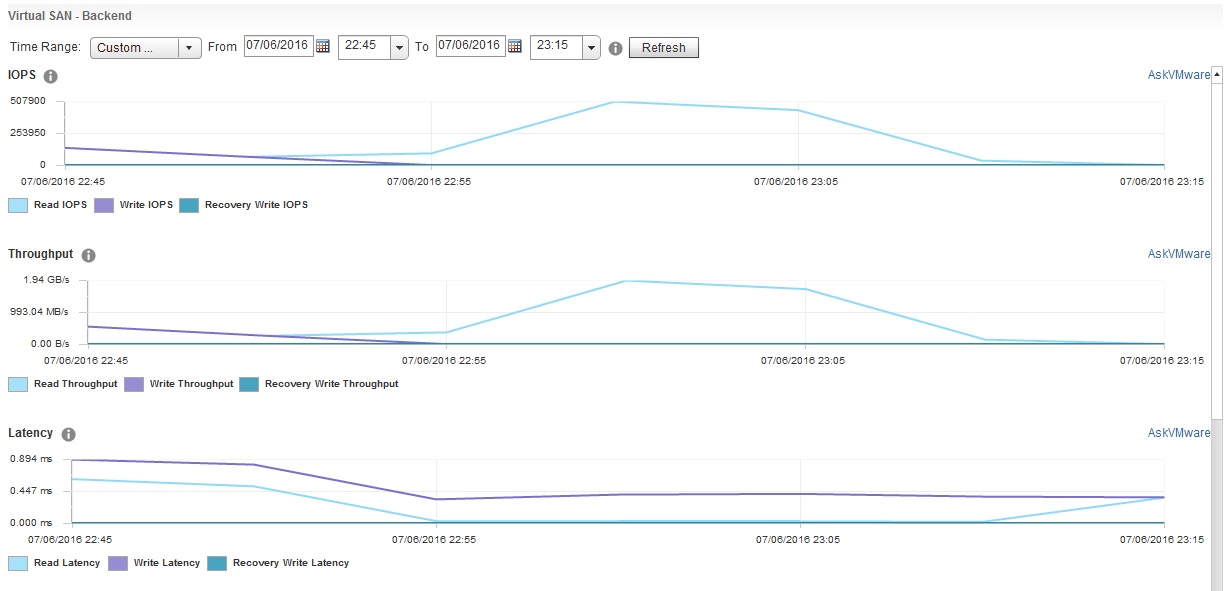
If we do the same for the All-Flash Demo these are the results based on the profile “Performance characterization – 100% read, Low RC hit rate / All-Flash Demo”
Again if we look at out performance charts for the same period of time we can see that the IOPS was over half a million for the cluster at 4K Block Size
Customers always ask me how realistic these tests are, I have done some comparisons with HCIBench also, and so have some of my customers, and HCIBench produces the same results, so as you can see the Virtual SAN Proactive Tests can save you a lot of time and effort with regards to things like storage performance testing, and remember they are very I/O intensive, coupled with the new performance monitoring charts in Virtual SAN, you have more tools at your fingertips all within a single user interface.
Enjoy 🙂